


Match a Cycle Computer to Your Goal: 4 Rider Types and What Data to Prioritize
Posted by Matt Russ on 20th Sep 2026
Match a Cycle Computer to Your Goal: 4 Rider Types and What Data to Prioritize
If you train with power, prioritize a head unit that displays and logs watts reliably. If you explore unfamiliar roads, prioritize full mapping with rerouting. If you just want to know how far and how fast you rode, speed, distance, and battery life matter more than anything else. This article breaks those three groups down: core ride metrics, navigation tools, and training sensors, so you can stop paying for features you’ll never touch.
TL;DR:
- Most riders only need to focus on speed, distance, ride time, and battery life, as these core metrics are most relevant for casual riding.
- GPS-based speed and distance can be off by significant margins in challenging environments, so calibration and sensor choice are crucial for accuracy.
- Navigation tiers range from basic breadcrumb trails to full mapping with rerouting, with turn-by-turn being optimal for exploring new areas, while full maps drain more battery and processing power.
- Training data like power and heart rate provide instant effort insights, but power is the most actionable metric, especially for structured training and pacing.
- Proper setup including sensor protocols, mounting, display clarity, and battery management is essential to maximize data reliability and usability during rides.
Table of Contents
- What Are the Core Ride Metrics on a Cycle Computer?
- How Much Navigation Do You Actually Need?
- Heart Rate, Cadence, and Power: What Training Data Actually Tells You
- ANT+, Bluetooth, and Sensor Setup: Getting Connectivity Right
- Display, Mounting, and Toughness: What Keeps Data Visible
- Battery Life: What to Expect and How to Extend It
- File Formats, App Sync, and Coach Workflows
- Matching Your Cycle Computer to Your Rider Type
- Building a Data Screen That Actually Helps You Ride
- Sport Factory Pro Shop’s Take on Configuring Your Head Unit
- The Mistake Most Riders Make With Their Data
- Gear Up Your Head Unit the Right Way
- Sources
- FAQ
What Are the Core Ride Metrics on a Cycle Computer?
Every cycle computer, from a $30 wired unit to a $600 GPS head unit, tracks a handful of baseline numbers. Understanding what they actually measure, and where they can lie to you, matters more than any spec sheet.
Current speed shows your speed at this exact moment, calculated from either GPS positioning or a wheel sensor. Average speed divides your total distance by your ride time, giving you a sense of overall pace across the ride. Max speed logs the single fastest moment, which is fun for bragging rights but not something to check mid-ride. Trip distance and the odometer track your current ride versus your lifetime mileage on the bike, and ride time (moving time, specifically) excludes stops at lights or coffee shops so your pace numbers stay honest.
Here’s where riders get tripped up: GPS-based speed and distance differ from wheel-sensor-based numbers, sometimes by a meaningful margin. GPS calculates position by triangulating satellite signals, and in dense tree cover, deep canyons, or between tall buildings, that signal can bounce or drop, inflating or shorting your distance. A wheel sensor, by contrast, counts wheel rotations and multiplies by your tire’s circumference. It’s mechanically precise, but only as accurate as the circumference value you entered.
That’s the calibration step most riders skip. If you tell your computer you’re running a 700x25c tire when you’ve actually mounted a 700x32c, every distance and speed reading skews off. The fix takes thirty seconds: measure your wheel’s actual rolling circumference (roll it one full rotation and measure the distance, or look up the standard value for your exact tire size) and enter it manually rather than trusting the default.
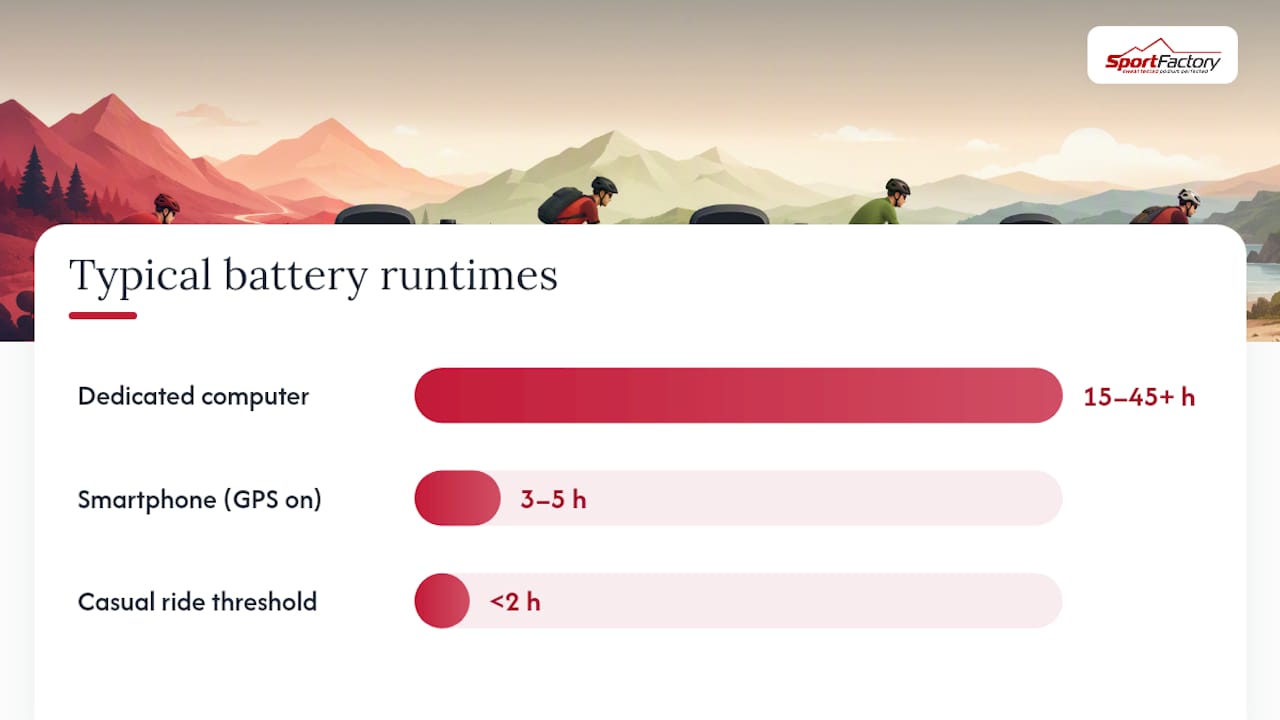
So when should you trust a smartphone for these basics instead of buying a dedicated unit? Honestly, for casual rides under two hours, a phone with a cycling app does the job fine. Where it falls apart is battery life and durability. Dedicated cycle computers typically run 15 to 45-plus hours on a charge, while a GPS-enabled smartphone often drains in three to five hours under active GPS and Bluetooth use. Phones also lack the sunlight-readable, low-power displays built for outdoor visibility, and mounting one directly to your handlebar without vibration damping risks long-term damage to its internal components, particularly image stabilization hardware in the camera module.
A few practical notes on reading these numbers correctly:
- Moving time, not elapsed time, is the number that should drive your pacing decisions.
- Recalibrate wheel circumference any time you change tire size or brand.
- Treat max speed as trivia, not training data. It rarely reflects sustainable effort.
- GPS accuracy improves on open roads and degrades under heavy canopy or in urban canyons.
- A wired sensor is more reliable in mixed terrain since it doesn’t depend on satellite signal at all.
Get these fundamentals right and everything else on the device, navigation, training zones, sensor data, builds on a foundation you can actually trust.
How Much Navigation Do You Actually Need?
Navigation features on cycle computers fall into three tiers, and picking the wrong one wastes money in either direction. Buying full mapping when you only ride the same ten familiar loops is overkill. Skipping it when you explore new terrain leaves you stranded with a paper map mentality in a GPS world.
The most basic tier is breadcrumb navigation. The device draws a thin line showing the route you loaded, but it won’t tell you which way to turn or reroute you if you drift off course. It’s a “you are here, and this is where you’re supposed to be” system, which works fine if you’re comfortable interpreting a route line against real roads.
Turn-by-turn navigation is the middle tier and, for most riders who explore new areas regularly, the sweet spot. The unit alerts you before each turn with a beep or vibration, so you’re not staring at the screen constantly. This is genuinely one of the most useful features for anyone who rides unfamiliar routes, group rides in new cities, or point-to-point gravel adventures.
Full on-device mapping with rerouting is the top tier, functioning closer to a car GPS than a simple trail. If you miss a turn or want to detour to a coffee shop, the unit recalculates and gets you back on track. This tier demands the most processing power and battery, and it’s the feature that separates a $150 entry-level computer from a $400-plus mid-range unit.
A few things to weigh before you commit to a tier:
- Pre-loading a route matters even on turn-by-turn units, since real-time route calculation on the fly isn’t universal and can lag on climbs or in dead zones.
- Rerouting quality varies wildly between brands. Some recalculate in seconds; others take a frustrating pause while you’re already off course.
- Offline map storage is worth checking if you ride in areas with unreliable cell coverage, since some units rely on a paired phone for live map data.
- Dual-band GPS, which pulls signals from multiple satellite systems rather than one, generally improves accuracy in challenging environments like tree cover and urban canyons compared to older single-band units.
Screen size and touch interface come into the picture here too. A touchscreen makes zooming and panning a map intuitive, similar to using a phone, but touchscreens can misfire in the rain or when you’re wearing full-finger gloves in cold weather. Buttoned units are slower to navigate menus but never fail because your screen is wet. If you ride gravel or mixed-surface routes where road quality shifts constantly, pairing your navigation choice with the right tire setup matters too. Wider gravel tires in the 35 to 40mm range hold speed close to a road tire on pavement while giving you the traction margin to explore rougher routes your navigation unit just opened up.
Sunlight readability deserves its own mention. A map is useless if you can’t see it at noon on a cloudless day. Look for a transflective or high-brightness display rated specifically for outdoor visibility rather than a standard smartphone-style panel.
Heart Rate, Cadence, and Power: What Training Data Actually Tells You
Training metrics answer a different question than navigation or basic speed data. They tell you how hard your body is working right now, and whether that effort matches your goal for the day.
Heart rate is the oldest and most accessible training metric, measured via a chest strap or optical wrist sensor paired to your head unit. It divides your effort into zones, typically five, based on percentage of max heart rate or lactate threshold heart rate. Zone 2 rides build aerobic base; Zone 4 and 5 intervals build top-end fitness. Heart rate’s biggest limitation is lag and drift: it takes minutes to climb to reflect a hard effort and stays elevated during recovery, plus heat, caffeine, illness, and poor sleep can all skew a reading on any given day. It’s a useful long-term trend indicator, not a precise, instant readout.
Cadence measures your pedaling rate in revolutions per minute, tracked by a small sensor on your crank or pedal. Most efficient riders spin between 80 and 100 RPM, though this varies by rider and terrain. Cadence data becomes genuinely useful when it changes how you pace a climb: a rider who mashes at 60 RPM up every hill burns through leg strength fast, while shifting to an easier gear and spinning at 85 RPM often sustains the effort longer with less fatigue. Cadence also plays into biomechanics. If your knees ache after long rides, cadence combined with crank length can be worth investigating, and shortening your crank arms by 5 to 10mm can reduce knee strain without costing you power output.
Power, measured in watts, is the most actionable metric available on a cycle computer, and it’s not close. Where heart rate lags and cadence measures technique, power tells you exactly how much work your legs are producing at this instant, with no delay and no environmental noise. Structured training built around Functional Threshold Power (FTP), your sustainable one-hour effort, lets you target precise zones for intervals, tempo rides, and race pacing rather than guessing off feel.
Power meters come in a few configurations, each with trade-offs:
- Pedal-based meters are the easiest to swap between bikes and generally the most precise, though they carry a higher price tag.
- Crank-based meters integrate into the crank arm or spider and offer excellent reliability, but they’re bike-specific unless you buy a second unit.
- Hub-based meters measure at the rear wheel and are simple to install, though they can be slightly less accurate on rides involving frequent gear changes.
If you’re serious about structured training, choosing the right meter type is worth its own research before you commit. A dedicated breakdown of power meter types walks through which configuration fits different riding styles and budgets.
Pro Tip: Don’t stare at instantaneous power on a climb. It jumps around too fast to pace off of. Switch your display field to a 3-second or 10-second rolling average instead. It smooths out the noise and gives you a number you can actually hold steady.
ANT+, Bluetooth, and Sensor Setup: Getting Connectivity Right
Two wireless protocols dominate cycle computer sensor connections, and knowing the difference saves you a lot of pairing frustration.
- ANT+ is a low-power protocol built specifically for fitness devices. It handles multiple simultaneous sensor connections cleanly and has been the cycling industry’s connectivity backbone for years.
- Bluetooth LE (Low Energy) is the same protocol your phone and headphones use, and most modern sensors now support it alongside ANT+.
- Dual-protocol support, meaning your head unit reads both, matters most if you own sensors from different brands or want to occasionally pair a sensor directly to your phone without a head unit in the loop. REI’s buying guidance notes that sensor compatibility across heart rate, cadence, and power should factor directly into which head unit you choose, since a unit that only reads one protocol locks you into a narrower sensor ecosystem.
The typical sensor lineup includes a heart rate chest strap (or optical wrist band, slightly less accurate), a cadence sensor clipped to your crank arm, a speed sensor on your wheel hub if you’re not relying on GPS, and a power meter in one of the configurations described above. Installation is generally straightforward, most snap onto a crank arm or strap around your chest, but battery contacts on cheaper sensors corrode over time, so a quick wipe with a dry cloth every few months keeps connections solid.
Pairing reliability comes down to a few habits:
- Pair one sensor at a time rather than powering on your whole bike’s sensor suite at once, which can cause your head unit to grab the wrong signal.
- Keep sensors within a few feet of the head unit during initial pairing, then test at riding distance.
- If you get intermittent drops, check for interference from other electronics, other riders’ sensors in a group ride, or a dying coin-cell battery, which weakens signal strength before it dies completely.
- Update your head unit’s firmware before troubleshooting a pairing issue, since manufacturers frequently patch sensor compatibility bugs.
Dual-protocol support genuinely prevents headaches for riders who share sensors across multiple bikes or switch between a head unit and a phone app, and it’s worth checking before you buy rather than discovering the limitation after your sensor won’t pair.
Display, Mounting, and Toughness: What Keeps Data Visible
A cycle computer only helps you if you can actually read it while riding, and that comes down to a short list of physical traits.
Screen contrast and brightness matter more than resolution for outdoor use. A transflective display, which uses ambient light rather than fighting against it, tends to stay readable in direct sun far better than a standard backlit panel. Size matters too, but bigger isn’t automatically better if it means a bulkier unit catching wind or blocking your view of the road ahead.
Touchscreens offer intuitive map panning and zooming, but they struggle with wet fingers, rain, and winter gloves. Physical buttons cost you some navigation speed through menus but never fail to register a press because of weather. If you ride in variable conditions across seasons, a hybrid unit with both touch and button controls covers more scenarios than either alone.
Mounting matters just as much as the display itself:
- Out-front mounts keep the unit in your direct line of sight without dropping your head to check the stem.
- Quarter-turn mounts let you swap the unit between bikes quickly, useful if you own a road bike and a gravel bike.
- If you’re mounting a phone instead of a dedicated unit, add a vibration-damping mount. Prolonged handlebar vibration without dampening can degrade sensitive smartphone components over time, particularly camera stabilization hardware, something dedicated cycling computers are built to withstand.
- Check your unit’s water resistance rating (commonly IPX7 or better on mid-range units) if you regularly ride in rain, since exposure without adequate sealing shortens a device’s working life fast.
Toughness isn’t glamorous, but it’s the difference between a computer that survives five seasons of gravel washboard and one that cracks its screen on the first rough descent.
Battery Life: What to Expect and How to Extend It
Battery runtime varies enormously by device class, and understanding why helps you avoid a dead screen thirty miles from home. Entry-level units with simple GPS tracking commonly run 15 to 20 hours, while dedicated cycle computers overall span a range of roughly 15 to 45-plus hours depending on features enabled, compared to a smartphone’s typical three to five hours under active GPS and Bluetooth use.
What drains a battery fastest, in order of impact, is continuous GPS tracking, screen brightness set high, and multiple sensors connected simultaneously over Bluetooth or ANT+. Higher-end units increasingly offer solar-assisted charging and extended battery modes that trade some GPS precision or refresh rate for dramatically longer runtime, genuinely useful for multi-day bikepacking trips or ultra-distance events where you can’t recharge overnight.
A few strategies extend runtime without sacrificing the data you need most:
- Switch to a battery-saver or extended GPS mode for long rides where you don’t need second-by-second position updates.
- Dim screen brightness manually rather than relying on auto-brightness, which can run brighter than necessary in overcast conditions.
- Carry a small USB power bank and a cable compatible with your unit for multi-day rides, charging during lunch stops rather than waiting for a full drain.
- Turn off sensors you’re not actively using that ride, since a paired-but-unused sensor still draws a small connectivity overhead.
Charging cadence matters most on multi-day tours. Top off every evening rather than waiting until the unit’s near empty, since partial daily charges on most lithium batteries cause less long-term degradation than deep discharge cycles.
File Formats, App Sync, and Coach Workflows
Your ride data has to go somewhere after you finish riding, and the format it’s saved in determines what you can do with it later.
FIT files are the modern standard, compact and packed with detailed sensor data including power, heart rate, and cadence at high resolution. GPX files store route and location data well but strip out most sensor detail, making them ideal for sharing a route but weak for training analysis. TCX files sit in between, carrying both GPS and some sensor data, and remain common for compatibility with older platforms. For serious training analysis, FIT is almost always the right format, while GPX works fine for sharing a route with a riding buddy who just needs the map.
Most modern head units sync automatically to the cloud over Wi-Fi or a paired phone connection once you finish a ride, pushing data to platforms like Strava or TrainingPeaks without you touching a cable. Manual export still matters if you’re working with a coach on a specific platform that doesn’t support automatic sync, or if you want a local backup of your training history outside any single company’s servers.
The ecosystem you choose, meaning the manufacturer’s app and cloud platform versus an open, third-party-friendly system, ends up mattering as much as the hardware specs, because it determines whether your coach can pull your data easily, whether you keep access if you switch head unit brands later, and how much manual export work you’ll do long-term.
- Live segment tracking during a ride (matching your pace against a known stretch of road) differs from post-ride coach metrics, which analyze the full file for training load, recovery, and trend data.
- Some electronic groupset integrations, like SRAM AXS, can automatically feed battery and gear data straight into your head unit display, a small but genuinely convenient touch for riders already on electronic shifting.
- Cyclists interested in HRV and broader training-load context beyond basic zones may find neurotraining-based approaches worth exploring alongside standard power and heart rate metrics.
Matching Your Cycle Computer to Your Rider Type
The single biggest mistake buyers make is shopping by feature count instead of by what they’ll actually use. Most riders only touch a handful of fields on every single ride, so matching the device to your actual riding style, not the longest spec sheet, saves money and frustration.
- The casual rider wants speed, distance, ride time, and enough battery to not think about charging weekly. Skip power meters and full navigation entirely; a basic GPS unit or even a well-mounted phone covers this rider fine. Budget stays low here, often under $150.
- The explorer who rides unfamiliar roads and gravel routes needs strong navigation above everything else: turn-by-turn at minimum, full on-device mapping with rerouting if the budget allows. Battery life matters a lot too, since exploration rides run long and unpredictable. Cadence and heart rate are nice extras, not essentials.
- The trainer building structured fitness needs heart rate as a baseline and power as the real priority if the budget stretches that far. Navigation matters less here since training rides often repeat familiar routes. Data field customization and post-ride analysis integration with a platform like TrainingPeaks carry more weight than screen size.
- The racer wants a minimal, distraction-free display focused on power, cadence, and distance-to-go, plus fast GPS lock and reliable multi-sensor pairing. Navigation stays secondary during a race itself, since routes are usually memorized or marshaled, but pre-loaded course maps matter for training rides on race courses beforehand.
Pro Tip: When you’re standing in a shop or scrolling a product page, ask yourself one question for every feature: “Will I check this in the first three rides and then never again?” If the honest answer is yes, you’re paying for a spec sheet, not a tool you’ll use.
A short checklist to run through before you buy or configure a new unit: confirm sensor protocol compatibility with gear you already own, check the battery runtime against your longest typical ride, verify the display is sunlight-readable in a store demo if possible, and confirm the data platform you want (Strava, TrainingPeaks, or a manufacturer’s own app) syncs cleanly with the unit you’re considering.
Building a Data Screen That Actually Helps You Ride
Fewer fields, arranged well, beat a cluttered screen every time. A good race screen might show only power, cadence, and distance-to-go. An endurance screen might pair average speed, elapsed time, and heart rate. A navigation screen should show the map large with maybe one supporting metric, like current speed, underneath.
Professional racers keep their displays minimal and map-focused during competition, typically showing just power and distance-to-go alongside the course map, while amateur riders commonly overload their screens with six or more fields that become unreadable at speed. Two to four fields per screen is the sweet spot most buyer guides converge on.
A quick test-ride checklist before you commit to a layout:
- Ride a familiar loop with your new screen setup and note whether you had to squint or hesitate to read any field.
- Practice switching screens mid-ride using whatever button or swipe gesture your unit assigns, since fumbling for a screen-change button at speed is a real hazard.
- Confirm your out-front mount angle doesn’t create glare from overhead sun at your typical riding times.
Pro Tip: Set up a dedicated “climb screen” if you ride hilly terrain often. Gradient, cadence, and a rolling power average tell you everything you need on a climb without the noise of total ride time or max speed cluttering the view.
Sport Factory Pro Shop’s Take on Configuring Your Head Unit
A good recommendation is to match your device’s features to your actual riding goals, not to whatever spec sheet has the longest list. A racer buying a unit loaded with tourist-grade mapping features is paying for weight and battery drain they’ll never use. A gravel explorer skipping full navigation to save $100 is setting themselves up to get lost on an unfamiliar fire road.
Cycling gear should be chosen by riders who know what they need, such as a power meter that holds calibration or a mount stable enough to survive washboard gravel without losing your data screen to vibration blur. If you’re building out your setup, our guide on choosing a power meter that won’t make you buy twice pairs well with the training section above, and our pre-ride disc brake safety checklist is worth thirty seconds before any ride where your head unit is tracking serious effort.
The Mistake Most Riders Make With Their Data
Riders chase transient numbers. They stare at instantaneous power on a climb, watch heart rate creep up mid-interval, and treat every fluctuation like a signal instead of noise. That habit ruins pacing and steals attention from the road.
Pick one metric to act on during the ride itself, power average or heart rate zone, and let everything else log quietly for review afterward. Revisit your screen setup every few months. The fields that mattered when you bought the unit rarely match the ones you actually need a year into training.
— Matt
Gear Up Your Head Unit the Right Way
A great cycle computer is only half the setup. The mount, sensors, and battery backup around it decide whether your data survives the ride. Cycling gear from trusted brands is curated for riders who need equipment that performs under real racing and training conditions, not just on a spec sheet.

If you’re piecing together a full setup, our components category covers mounting hardware and cockpit gear built to hold a head unit steady through washboard gravel and sprint finishes alike, while our broader bike accessories selection includes lights, tools, and inflation systems worth stocking alongside any sensor-heavy setup. Every product we carry gets selected for engineering quality and rider-focused features, not just brand recognition. Browse the current lineup at Sport Factory Pro Shop and reach out to our team if you want a second opinion on matching gear to your specific riding goals before you check out.
Sources
For deeper technical grounding on the topics covered here, these sources informed the guidance above: the cyclocomputer overview on Wikipedia for hardware fundamentals, Cycling Labs’ feature breakdown for buyer priorities, REI’s expert buying guide for sensor and feature comparisons, and Cycling Weekly’s look at pro race screens for minimalist display strategy.
- Cyclocomputer — Wikipedia
- Cycling computers explained: what features you actually need — Cycling Labs
- How to choose a bike computer — REI Expert Advice
- What data screens do Tour de France cyclists use? — Cycling Weekly
FAQ
What are bike computers good for?
Bike computers track core ride metrics like speed and distance, provide navigation for unfamiliar routes, and log training data such as heart rate, cadence, and power for structured workouts. Which of those matters most to you depends entirely on your riding goal, whether that’s casual tracking, exploring new roads, or building fitness through data-driven training.
What is considered the best bike computer?
There’s no single best unit. The right choice depends on rider type. Buyer guides consistently recommend prioritizing readable displays, dependable navigation, and sensor compatibility over raw feature count, since most riders only use a handful of fields regularly.
What cycle computers do the pros use?
Professional riders favor units and screen setups that stay minimal during competition, typically showing power, cadence, and distance-to-go alongside a course map rather than a cluttered multi-field display. The lesson for amateur riders is less about brand and more about screen discipline.
What is the best bike computer for value for money?
Value comes down to matching features to your riding style rather than chasing the highest-spec model available. A casual rider gets excellent value from an entry-level GPS unit under $150, while a trainer or racer sees better returns investing that same budget into a reliable power meter, available through guides like Sport Factory Pro Shop’s power meter breakdown, paired with a mid-range head unit rather than a top-tier unit loaded with unused navigation features.