

Riders: Tubeless Tire Pressure, Calculator First, Shop Tested 55–75
Posted by Matt Russ on 30th Aug 2026
Riders: Tubeless Tire Pressure, Calculator First, Shop Tested 55–75
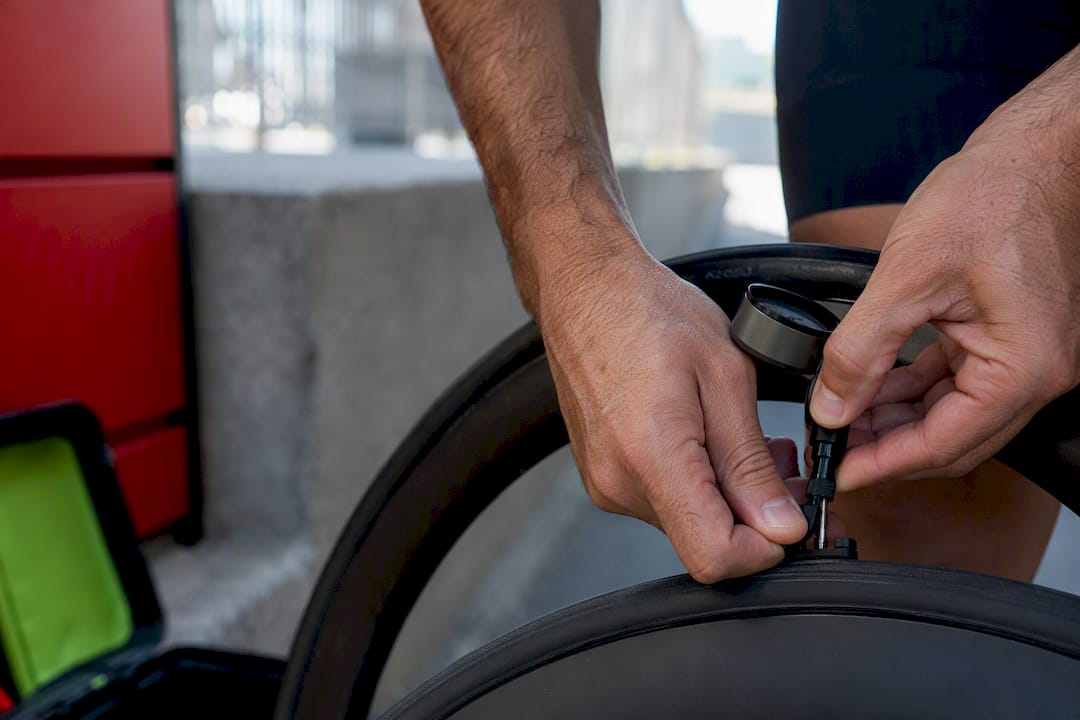
Start road tubeless around 55-75 psi, gravel around 28-40 psi, and mountain bike tires around 18-28 psi, then fine-tune from there. Set your front tire 2-4 psi lower than the rear, and make changes in small 2-3 psi steps until handling feels stable. Whatever number you land on, never exceed the lower of your tire’s or rim’s rated maximum.
TL;DR:
- Start with 55-75 psi for road tires, 28-40 psi for gravel, and 18-28 psi for mountain bikes, then fine-tune based on handling.
- Always run the lower of your tire’s or rim’s maximum pressure rating, especially on hookless rims, to prevent damage or safety issues.
- Adjust pressures in 2-3 psi increments during a short test ride until your bike feels stable and confident on terrain.
- Check and top up sealant every one to three months for mountain bikes, and every two to four months for road and gravel, depending on conditions.
- Use a pressure calculator for initial setup and fine-tune pressures through ride feedback, considering rim width and tire volume for optimal performance.
Table of Contents
- What Is the Right Tubeless Tire Pressure to Start With?
- How Do You Pick a Baseline and Tune It on a Ride?
- What Pressure Range Fits Your Discipline and Terrain?
- Why Do Hookless Rims Have Lower Pressure Limits?
- How Often Should You Check and Top Up Sealant?
- How Do You Use a Pressure Calculator Correctly?
- Why Does Your Tire Keep Burping, Leaking, or Losing Pressure?
- How Sport Factory Pro Shop Applies These Guidelines
- Get the Gear That Makes Tubeless Setup Easier
- Sources
What Is the Right Tubeless Tire Pressure to Start With?
Tubeless systems let you run noticeably lower pressure than tubed setups because there’s no risk of pinching a tube against the rim on a hard hit. That’s the entire point of going tubeless in the first place, and it’s why the starting ranges for road, gravel, and mountain bike tires sit well below what most riders grew up using with tubes.
The chart below gives you a starting point based on combined rider and kit weight, since a 140-pound climber and a 220-pound rider on the same bike need different air pressure to get the same ride feel.
These numbers assume a modern tubeless-ready rim, tires set up with sealant rather than tubes, and a weight figure that includes your hydration, tools, and anything else riding along with you. A wider internal rim width pushes you toward the lower end of each band, since more air volume does the same job at lower pressure.
One rule overrides every number on this chart: always run the lower of your tire’s or your rim’s maximum rated pressure, never the higher one. Many hookless rims cap out well below what the tire sidewall allows, and that cap exists for a reason.
How Do You Pick a Baseline and Tune It on a Ride?
Getting your tubeless tire pressure dialed in isn’t a one-shot calculation. It’s a short, repeatable process that takes one good test ride to nail down.
- Estimate total weight. Add your body weight to your kit (water bottles, tools, saddle bag) and find your row on the chart above.
- Set front and rear separately. Drop the front tire 2 to 4 psi below the rear. The front carries less load under braking and benefits from extra grip and compliance.
- Seat the beads and confirm pressure. Inflate to seat both tire beads fully before setting your final test pressure, then check both wheels with a gauge.
- Ride a short test loop. Spend 10 to 20 minutes on terrain you know well, paying attention to rim strikes on hard hits, cornering traction, and general comfort over chatter.
- Adjust in small steps. If you feel harsh rim strikes or the bike bounces off small bumps, drop 2 to 3 psi. If the tire squirms in corners or feels vague, add 2 to 3 psi. Stop once handling feels stable and confident.
Pro Tip: Log your pressure, tire, terrain, and weather after every setup change. A simple notes app entry, “72/68 psi, 32mm tires, dry hardpack, 68°F,” saves you from re-testing the same conditions twice next season.
This same workflow works whether you’re tuning a road bike for a Saturday group ride or dialing in an enduro bike before a race weekend. The variables change; the process doesn’t.
What Pressure Range Fits Your Discipline and Terrain?
Discipline sets the general window, but terrain and riding style move you around inside that window on any given day.
- Road (25-32mm tires): Start in the 55-75 psi range depending on width, and expect to run 5-10 psi lower than the pressures riders used a decade ago on narrower, tubed setups. Hookless carbon rims often impose their own cap here, so check before you inflate.
- Gravel (35-45mm tires): Sit in the 28-40 psi range as a baseline. Push toward the higher end on smooth hardpack and fire roads where rolling speed matters most, and drop toward the lower end on chunky, rocky, or root-strewn terrain where compliance and grip matter more than speed.
- Mountain bike, cross-country: Typically 21-26 psi rear, 2-4 psi lower up front, prioritizing rolling efficiency on smoother trail networks.
- Mountain bike, trail and enduro: Often 18-24 psi, sometimes lower with a tire insert protecting the rim on aggressive, rocky descents where a pinch or rim strike is the real threat.
Across every category, tubeless setups typically run lower than their tubed equivalents because there’s no tube to pinch against the rim under impact. That’s the mechanical reason tubeless exists, and it’s why the pressure charts above look so different from what riders used fifteen years ago.
Why Do Hookless Rims Have Lower Pressure Limits?
Hookless rim design, increasingly common on road and gravel wheels, removes the small hook at the bead seat that hooked rims use to lock the tire in place. That design change is why many hookless road rims cap out around 72.5 psi, even when the tire itself is rated higher.
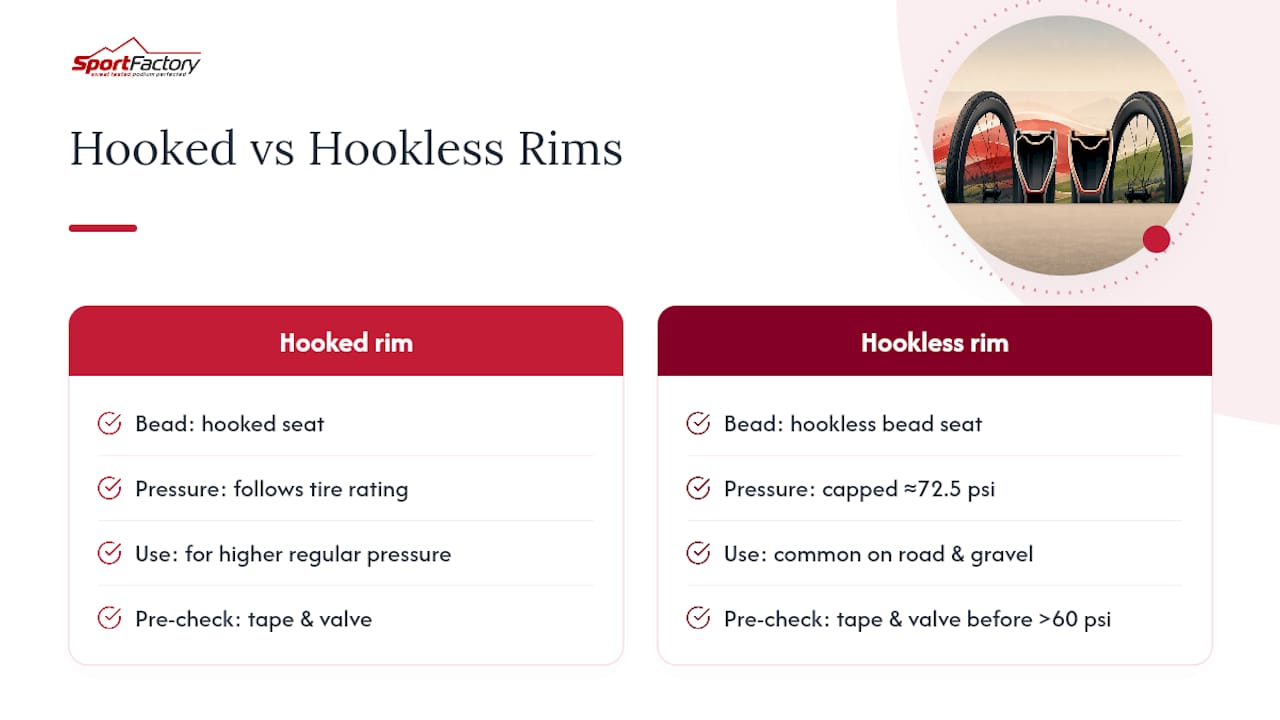
Always check both labels and obey the lower number. Before you inflate past 60 psi on any hookless setup, confirm the rim tape is seated cleanly and the valve is snug. If your riding demands consistently higher pressure, either a hooked rim or a tire with a higher published rating solves the problem better than pushing a hookless rim past its posted limit.
How Often Should You Check and Top Up Sealant?
Tubeless sealant does its job quietly until it doesn’t, and pressure problems often trace back to sealant that’s dried out rather than anything wrong with your pump. Check sealant levels every one to three months for mountain bikes and every two to four months for road and gravel setups, tightening that interval if you ride in hot or dry climates where evaporation runs faster.
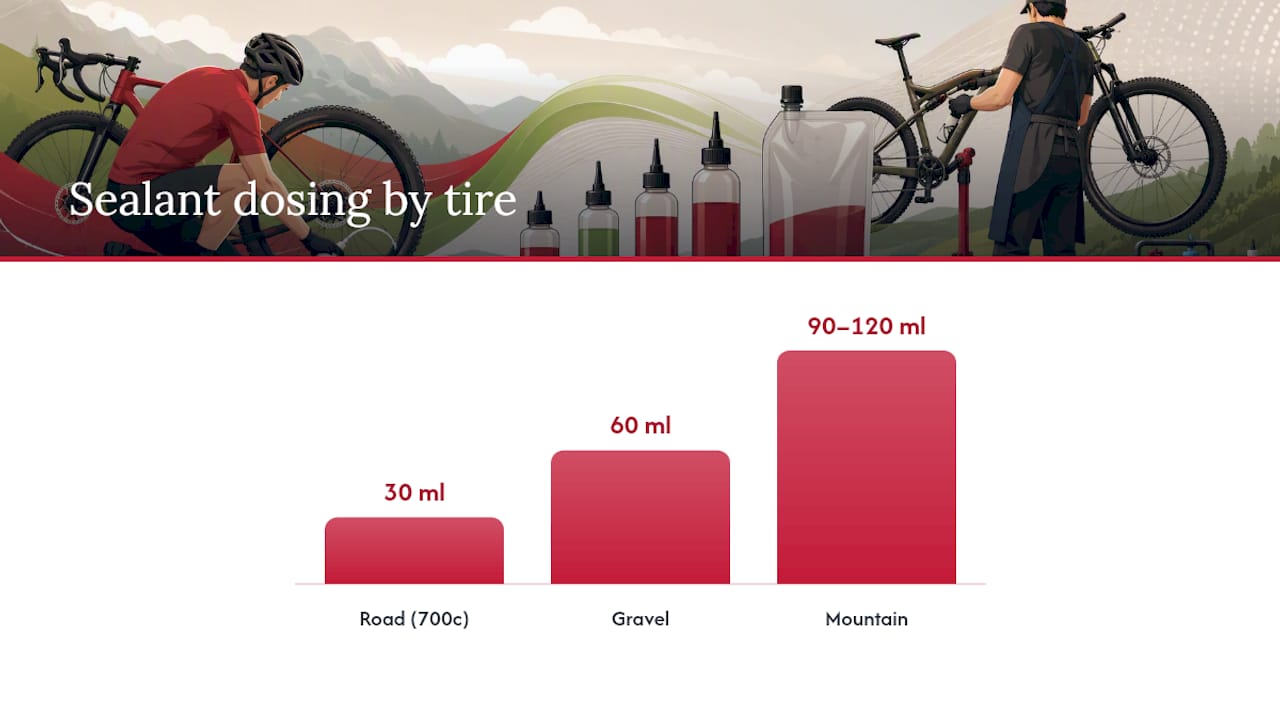
Dosing varies by tire type:
- Road tires (700c): roughly 30 ml per tire
- Gravel tires: roughly 60 ml per tire
- Mountain bike tires: roughly 90-120 ml per tire
Sealant that dries into rubbery clumps inside the tire can block fresh sealant from reaching a new puncture, so plan on a full annual cleanout even on a bike you check regularly. If you’re chasing a slow leak and topping up pressure doesn’t hold, check the valve core, rim tape, and bead seating before assuming you need more sealant. Roughly a third of tubeless complaints trace back to one of those three spots rather than the sealant itself.
How Do You Use a Pressure Calculator Correctly?
A calculator gets you close; a short ride gets you exact. The three inputs that actually move the output are your combined rider and kit weight, tire width, and rim internal width, since a wider rim adds air volume and typically lets you run 2 to 5 psi lower for the same feel.
- Enter your weight, tire width, and rim internal width into the calculator to get a starting number.
- Seat the tire with a high-volume booster or a quality track pump. A standard hand pump often struggles to seat tubeless beads reliably.
- Measure with a dependable digital gauge rather than trusting a pump head’s built-in reading, which can drift by several psi over time.
- Ride your test loop and adjust in 2 to 3 psi increments based on feel, since terrain nuance beats any single formula.
Why Does Your Tire Keep Burping, Leaking, or Losing Pressure?
Pressure problems almost always point to one of three causes, and matching the symptom to the fix saves you a wasted repair.
- Burping (sudden air loss in corners): Usually means pressure is too low for the load or the bead isn’t fully seated. Add 3 to 5 psi and check bead seating on both sides.
- Slow, steady leak overnight: Usually a valve core or rim tape issue, not a puncture. Check the valve core torque and inspect tape for wrinkles or gaps.
- Sudden pressure loss mid ride: Often a cut or puncture too large for sealant alone. Plug it, add air, and ride home carefully; install a tube if the sealant can’t keep pace.
Tubeless setups commonly lose 5 to 10 psi per week even with no problems at all, so check pressure before every ride rather than assuming last week’s number still holds. If a tire needs daily top-ups or won’t hold air for more than a day, stop riding it and schedule a full inspection before your next outing.
How Sport Factory Pro Shop Applies These Guidelines
Our workshop runs this same weigh, seat, and ride-test workflow on every tubeless build that comes through the door. We default customers toward wider internal rim widths and lower starting pressures unless their riding style says otherwise, and we check rim tape and valve seating before any bike leaves the shop. If your numbers don’t match what you’re feeling on the road, reach out and we’ll help you sort it.
— Matt
Get the Gear That Makes Tubeless Setup Easier
Dialing in tubeless pressure only pays off if the rest of your setup holds up, and that starts with the right sealant, a pump that actually seats beads, and tires built for the pressures you’re running.

Sport Factory Pro Shop stocks the tubeless essentials in one place: sealant in road, gravel, and mountain bike volumes, high-volume boosters and track pumps for reliable bead seating, tubeless-ready tires across road, gravel, and mountain bike disciplines, and repair kits for the inevitable trailside plug job. Buying a complete kit up front, rather than piecing it together from three different sources, means everything is matched to your setup from day one. If you’re not sure which tire width or sealant volume fits your bike, our team can walk you through it before you check out. Head to the Sport Factory Pro Shop landing page to browse tubeless tires, sealant, and inflators, and get your setup sorted before your next ride.