

Avoid an 8.3 Watt Drag: Carry 1L Bottles with Shop Tested Fit
Posted by Matt Russ on 19th Sep 2026
Avoid an 8.3 Watt Drag: Carry 1L Bottles with Shop Tested Fit
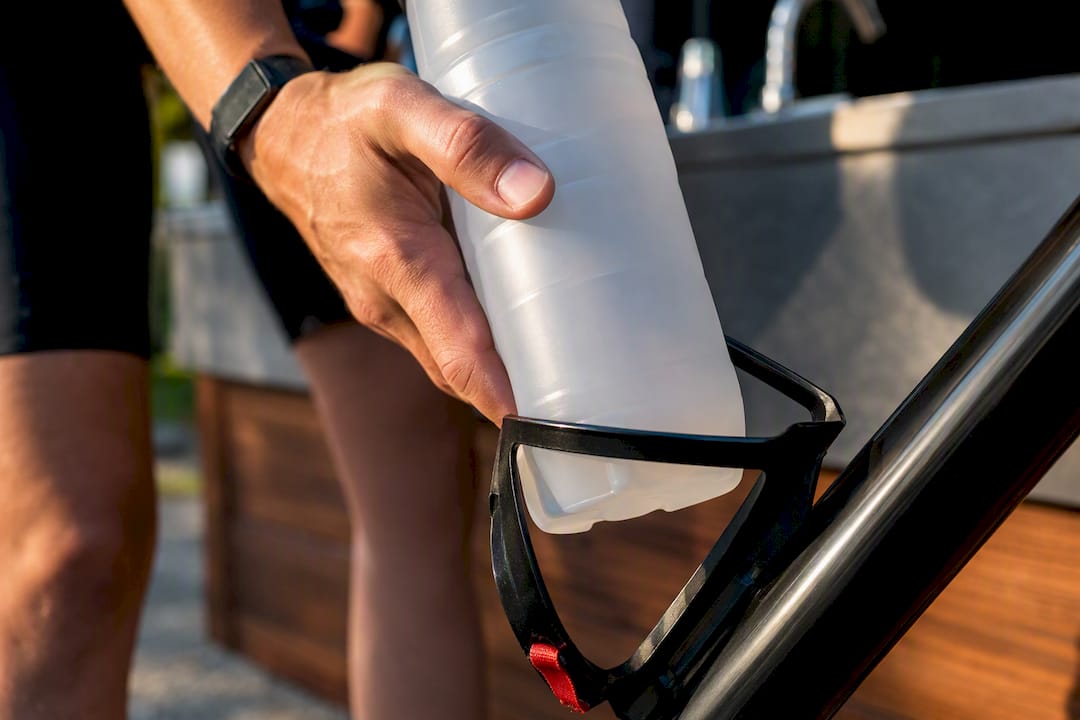
The most reliable setup combines two low-drag frame-mounted cages with a collapsible soft flask stashed in a jersey pocket for backup volume. This gives you fast access to water without piling weight up high, where it wrecks your steering. Riders chasing pure speed should skip the third-bottle mounts entirely and lean on smaller, better-placed bottles instead, since aerodynamics and handling both punish oversized loads in the wrong spot.
TL;DR:
- Using two frame-mounted cages on the downtube and seat tube, plus a soft flask in a jersey pocket, offers a reliable and aerodynamic hydration setup for long rides.
- Rigid bottles like Nalgenes often don’t fit narrow cages due to diameter limits, while collapsible soft bottles greatly ease packing and shifting in a cage.
- Carrying a full liter on the downtube adds about 8.3 watts of drag at 25 mph, impacting speed more during sustained, fast efforts.
- A bottle mounted high or forward, such as on the stem or handlebar, significantly worsens steering and handling due to added weight near the cockpit.
- Proper mounting checks, bolt torque, and secondary retention help prevent bottles from ejecting or cracking, ensuring safe and reliable hydration on the road.
Table of Contents
- How Do You Carry Extra 1L Bottles on a Road Bike?
- Which 1L Bottle Types Actually Fit Your Cages?
- Does a Big Bottle Really Slow You Down?
- Getting the Weight Right: Packing and Handling Tips
- Recommended Setups for Different Ride Types
- Is Your Bottle Setup Actually Safe on the Road?
- What Are the Rules for Carrying Bottles in Races?
- Can 1L Bottles Work With Bikepacking and Hydration Packs?
- Does Bottle Material Affect Weight and Comfort?
- What the Data Actually Tells You to Prioritize
- Get Your Hydration Setup Sorted
- Sources
- FAQ
How Do You Carry Extra 1L Bottles on a Road Bike?
Getting a full liter (or two) onto a road frame without turning your bike into a mule comes down to picking the right mount for your ride distance, then testing it before you actually need it. Most riders overthink the gear and underthink the fit check, which is exactly the piece that saves you from a rattling cage 40 miles from home.
Start with the mounts themselves. Here’s what works for road-specific setups:
- Third cage on the downtube or seat tube. Adapter clamps let you bolt a cage onto tubing that wasn’t drilled for bottle bosses, usually your seat tube or a fork leg on a gravel-leaning road frame. Check frame clearance first. A lot of aero and compact-geometry frames have a down tube-to-front-wheel gap too tight for a full 1L bottle, and you won’t know until you mock it up.
- Saddle-mounted carriers or seatpost bags. These sit behind your seat and accept 1L bottles in most designs, keeping weight low and rearward. Handling stays close to normal, though very upright seatpost bags can sway slightly during out-of-saddle climbing efforts.
- Handlebar or stem holsters. Small holsters clipped near the stem give you a grab-and-go bottle without reaching for a cage, which is genuinely useful in a fast group ride. The tradeoff is real: any weight that high and that far forward makes your steering noticeably twitchier, especially at low speed or in a sprint.
- Frame bags and top-tube pouches. These don’t usually carry rigid bottles well, but they’re excellent for a soft flask, letting you tuck backup volume without adding a hard, sloshing mass to the frame.
The combinations matter more than any single mount. A common setup for a hot century is two cages (downtube and seat tube) plus one soft flask folded flat in a jersey pocket, refilled only when the cages run dry. For a fast paceline ride where every watt counts, one small bottle up front and a soft flask in reserve beats two full-size 1L bottles bolted to the frame every time.
Before committing to a combo for a long ride, run through this quick check:
- Mount both cages empty first and spin the pedals through a full rotation to confirm heel clearance.
- Fill both bottles completely and take a 10 minute ride, including a few hard accelerations, to feel for wobble.
- Check bolt tightness after the first ride. Vibration loosens hardware faster than most riders expect, and a proper torque range for cage bolts prevents both stripped threads and mid-ride ejections.
- If you’re stacking multiple bottles for a multi-day trip, review your travel logistics for cartridges and tools alongside your hydration plan, since packing rules affect more than just water.
Which 1L Bottle Types Actually Fit Your Cages?
Not every 1L bottle fits a standard road cage, and this trips up more riders than the mounting question does. Diameter, not volume, is what determines fit.
Rigid wide-mouth bottles, like the Nalgene 1L On-The-Fly, are the classic choice for durability and easy filling from a hose or filter station. Nalgene’s wide-mouth design uses a leakproof lock-top and recycled-content resin, but its wider barrel doesn’t always slide into narrow racing cages built for 600ml road bottles. Measure your cage opening before you buy: most standard road cages accommodate a bottle diameter around 2.75 to 3 inches, and a Nalgene wide-mouth often runs slightly larger.
Collapsible soft bottles solve the fit problem differently. The HydraPak Stow 1L packs down to almost nothing when empty and includes an internal baffle that keeps it from flopping around loosely in a pocket or bag. That collapsibility is the real advantage on long rides. A half-empty rigid bottle still takes up full space and bounces around a cage; a half-empty Stow just shrinks.
Filter-equipped bottles change the equation entirely for remote routes. The LifeStraw Go Series 1L includes a replaceable filter, letting you refill from streams or questionable taps on self-supported rides instead of hauling every ounce from the start. It won’t fit every cage either, since the filter cap adds height, so check clearance under your top tube or seat rails if you’re mounting it high.
A few numbers worth checking against your own bike:
- Cage opening diameter (measure the narrowest point, not the mouth)
- Bottle height versus frame clearance (critical on smaller frames with a third cage)
- Bottle diameter at its widest point, including any sleeve or filter housing
Bikepacking gear reviewers who tested multiple 1L bottles for multi-day durability found that fit problems show up almost entirely at the cage mouth, not the depth of the cage itself. If the bottle slides in past the lip, it almost always seats fine.
Pro Tip: Bring your bottle to the shop before buying a new cage, or bring the cage home and test-fit it with your existing bottles first. A five-minute check avoids returning gear that “should have” fit based on the spec sheet.
Does a Big Bottle Really Slow You Down?
Yes, and the number is specific enough to plan around. A large, round 1-liter bottle mounted on the downtube creates roughly an 8.3-watt drag penalty at 25 mph compared with smaller or better-integrated hydration setups.
The 8.3-watt reality check: At sustained race pace, 8.3 watts is roughly the difference between holding a wheel and getting shelled off the back over a long climb or a hard chase. At a relaxed training pace, it barely registers.
That distinction is the whole decision. Testing that produced this figure also found that downtube placement is the worst spot for a large round bottle when aerodynamics matter, with behind-saddle or integrated hydration systems performing better for riders who need volume without sacrificing speed.
Here’s how the placement options stack up in practical terms:
- Downtube cage: Easiest to reach mid-ride, but the highest aero penalty for a large bottle at speed.
- Behind-saddle mount: Tucks out of the direct airflow and keeps weight low, though reaching back for a refill takes practice at speed.
- Integrated or aero-shaped bottles: Cut drag substantially versus round bottles but usually hold less than a full liter, so you trade volume for speed.
- Frame bag (where frame geometry allows): Adds negligible drag for a soft flask but isn’t built for rigid bottles.
For more on how bottle placement affects overall drag, the pattern holds across most testing: shape and position matter more than material. If you’re racing or riding a fast paceline, prioritize a smaller, lower-profile bottle and lean on a soft flask for reserve volume. If you’re out for six hours self-supported with no aid stations, the 8.3 watts stops mattering and volume wins. Aerodynamic penalties are meaningful mainly in high-speed sustained efforts; for a typical long training ride, handling and capacity usually decide the outcome instead.
Getting the Weight Right: Packing and Handling Tips
Where you put the weight matters as much as how much weight you carry. Mounting a full 1L bottle high on the bike, like in a stem-top bag or handlebar holster, measurably affects steering compared with keeping the same weight low and central. The higher and farther forward the mass sits, the more it amplifies every small steering correction, which gets tiring and occasionally dangerous in traffic or on descents.
The fix is straightforward: keep heavy bottles low and slightly rearward rather than high and forward. Riders who reduce perceived wobble on long rides tend to place heavier bottles toward the back of the frame and closer to the bottom bracket, keeping the mass inside the wheelbase instead of perched above the front wheel.
A practical distribution pattern for two full bottles: mount both in the main frame triangle rather than splitting one to the downtube and one to a stem bag. If you’re only running one bottle plus a soft flask, put the rigid bottle low and the soft flask in a jersey pocket rather than strapped up top.
Before any long ride with a full load, run this checklist:
- Torque cage bolts to spec. Overtightening cracks carbon cages; undertightening lets bolts walk loose from vibration.
- Add a zip-tie or small strap as secondary retention on rough roads or gravel sectors, especially with heavier rigid bottles.
- Recheck bolt tightness at your first rest stop on rides longer than three hours.
- Do a short handling test with full bottles before relying on the setup: a 30-minute test ride that includes hard braking and tight, slow turns reveals wobble you won’t notice cruising in a straight line.
Pro Tip: Test your fully loaded bike in a parking lot doing slow, tight figure-eights before your first long ride with a new bottle setup. If the front end feels vague or heavy in a slow turn, it’ll feel worse at mile 60 when you’re tired.
Recommended Setups for Different Ride Types
Different rides call for different bottle strategies, and matching the setup to the ride is usually more valuable than chasing the single “best” cage or bottle on the market.
For a fast group ride or race-pace effort, keep it minimal: one standard bottle on the downtube for quick swigs, plus a folded soft flask stuffed in a jersey pocket as backup. This keeps the aero penalty low and the bike light and responsive through corners and accelerations.
For a self-supported century or gran fondo, run two cages (downtube and seat tube) with rigid bottles for reliable access, and carry a collapsible flask as a third reserve for aid-station refills. The extra weight matters less here than the extra capacity.
For a short bikepacking day or gravel-adjacent road ride with fewer resupply points, a filter bottle like the LifeStraw Go earns its place, letting you top off from a stream or spigot instead of carrying every ounce from the start.
A few notes worth keeping in mind:
- Curated component selections, including cages and mounts, are worth browsing when you’re building out a setup from scratch rather than patching one together piece by piece.
- Fit support matters more for bottle carrying than most riders assume, since a cage that’s rated for “standard” bottles doesn’t always match the specific bottle you already own.
- Deeper technical reading on bolt torque and aero placement is worth a look before you finalize hardware choices, especially if you’re mixing brands of cages and bottles.
Is Your Bottle Setup Actually Safe on the Road?
A loose bottle at speed isn’t just annoying, it’s a real hazard, both to you and to whoever’s riding behind you. Bottles ejecting from cages on rough pavement or potholes have caused crashes in group rides, and a bottle that cracks or bursts mid-ride can dump fluid across your drivetrain or brakes at the worst possible moment.
Three risks deserve attention. First, fall-out risk rises with cage age and bolt looseness; carbon cages especially lose grip tension over time and benefit from periodic tightness checks. Second, breakage risk climbs with hard rigid bottles in a crash or a drop, where a Nalgene-style bottle can crack at the seam under the wrong impact angle, though its lock-top design generally resists leaking even when dented. Third, theft risk is real at cafe stops and gas station breaks. Bottles left in cages while you’re inside are an easy grab for anyone walking by, so pulling a distinctive or expensive bottle with you into a stop isn’t overly cautious, it’s just practical.
The lower-effort fix for most of these risks is the same secondary retention habit mentioned earlier: a zip-tie or small strap as backup, cheap insurance against a cage that lets go on a rough descent. Combine that with a quick pre-ride glance at bolt tightness and you’ve eliminated the most common failure points without adding real weight or cost.
What Are the Rules for Carrying Bottles in Races?
Most sanctioned road races and gran fondos don’t restrict how many bottles you carry or where you mount them, as long as the setup doesn’t create a hazard to other riders. That said, event-specific rules vary, and it’s worth checking the technical guide for any race you’re entering rather than assuming standard road norms apply.
Time trials are the exception worth knowing about. Many TT-specific events restrict bottle placement to approved aero positions, since race organizers are actively trying to keep the field’s equipment within a fair aerodynamic envelope. A downtube cage that’s perfectly legal in a road race might not be allowed in a UCI-sanctioned time trial.
Group road races generally care more about secure mounting than bottle count. A commissaire flagging a bike for a loose or rattling bottle is far more common than one flagging a bike for running three cages instead of two. If you’re racing self-supported gravel events or ultra-distance road events, most rules lean toward encouraging extra hydration capacity rather than limiting it, since organizers would rather riders carry enough water than run dry between checkpoints.
The practical takeaway: check your specific event’s technical regulations before race day, but for the vast majority of road rides and gran fondos, the safety and handling considerations covered earlier matter more than any formal rulebook.
Can 1L Bottles Work With Bikepacking and Hydration Packs?
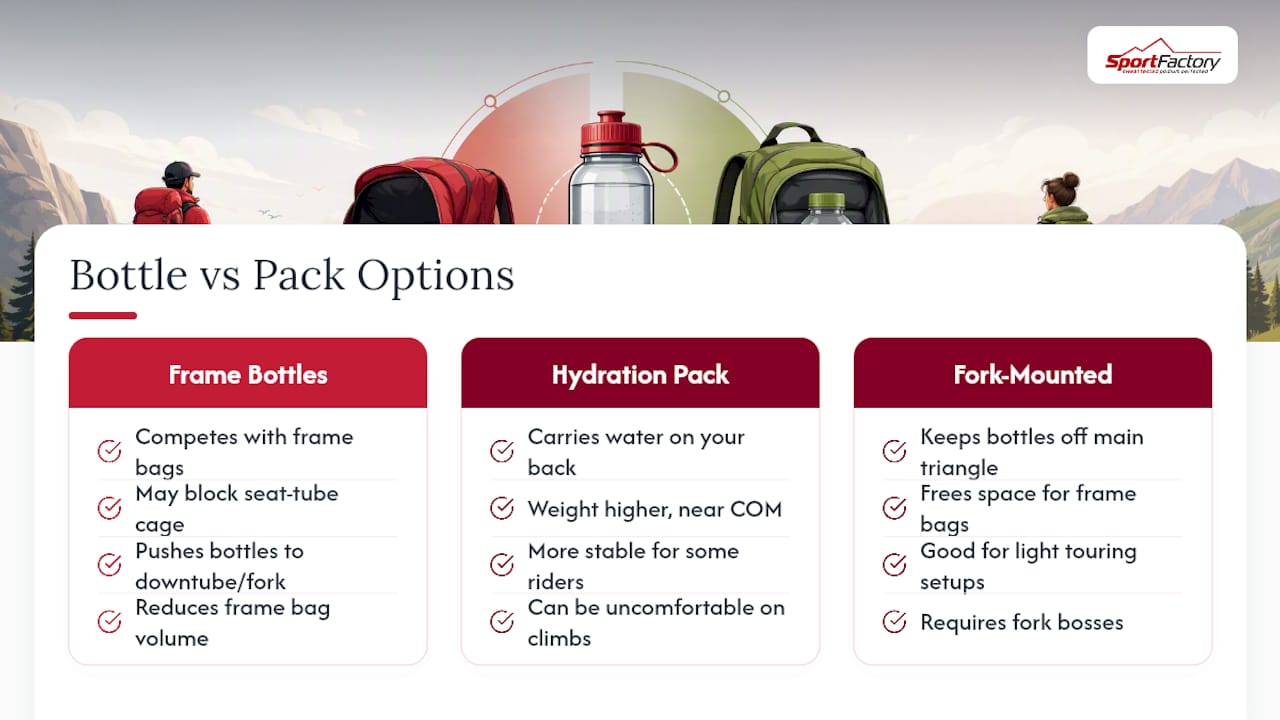
A 1L bottle fits comfortably into most bikepacking setups, but it competes for space with frame bags and top-tube bags rather than sitting alongside them cleanly. Riders running a full frame bag often lose access to their seat tube cage entirely, which pushes bottle capacity onto the downtube, fork mounts, or a hydration pack instead.
Hydration packs solve the capacity problem differently than bottles do, carrying water on your back instead of your bike. That shifts weight higher and closer to your center of mass, which some riders find more stable than a heavily loaded frame, while others find the added back weight uncomfortable on long climbs. Deciding when a hydration pack makes more sense than bottle-based carry usually comes down to how much total volume you need versus how much bag weight you’re willing to tolerate on your back for hours at a time.
For riders who want to stick with bottles on a bikepacking-style road setup, fork-mounted cages (on frames with fork bosses) are an underused option that keeps bottles off the main frame triangle entirely, freeing that space for a frame bag. This works especially well for road frames adapted for light touring, where you need both storage volume and hydration capacity without stacking everything onto the downtube and seat tube.
The compatibility question really comes down to space allocation: every liter of water you carry on the frame is a liter of bag space you don’t have, so plan your setup around whichever priority, hydration or storage, matters more for that specific ride.
Does Bottle Material Affect Weight and Comfort?
Material choice changes both the empty weight you’re hauling and how the bottle behaves once it’s full and bouncing around a cage for hours. The difference is bigger than most riders expect.
Rigid plastic bottles, like the Nalgene wide-mouth design, weigh more empty than soft alternatives but hold their shape reliably in a cage, which matters for consistent ejection resistance on rough roads. Nalgene’s construction uses BPA-free resin with recycled content, giving it durability that survives drops well, though that same rigidity means a full bottle’s weight sits at a fixed point in the cage rather than settling as it drains.
Collapsible soft bottles like the HydraPak Stow flip that tradeoff. They weigh less empty and take up dramatically less space as you drink, but they don’t hold a fixed shape in a cage, which means more shifting and occasional rattling on rough pavement if the cage doesn’t grip firmly.
Filter bottles add weight from the filter cartridge itself, a tradeoff that pays off only if you’re actually using the filtration to skip carrying extra volume. If you’re not refilling from natural sources, that extra ounce or two of filter housing is dead weight you’re hauling for no benefit.
For comfort over a long ride, the meaningful factor isn’t raw bottle weight so much as how consistently the bottle sits in the cage as it empties. A soft bottle that collapses evenly tends to ride quieter than a rigid bottle rattling in a slightly oversized cage, regardless of which one weighs more on a scale at the start of the ride.
What the Data Actually Tells You to Prioritize
Most bottle-carrying advice treats aerodynamics and handling as equally important, and that’s where the conventional wisdom breaks down. The 8.3-watt penalty from downtube-mounted bottles is real, but it only matters if you’re racing or riding hard enough that watts decide outcomes. For the majority of long road rides, the more consequential factor is handling stability from where you put the weight, not how many watts a bottle shape costs you.
The bigger gap in most advice is that it treats bottle selection and mounting as separate decisions. They aren’t. A perfectly aerodynamic bottle that doesn’t fit your cage, or a collapsible flask that flops around because it’s mounted too high, defeats the purpose of choosing it in the first place. Fit and placement decide whether the aero or capacity advantage you paid for actually shows up on the road.
If you take one thing from this: check clearance and torque before you obsess over watts. A secure, well-fitted setup with a modest aero penalty beats a theoretically faster setup that rattles loose at mile 40.
— Matt
Get Your Hydration Setup Sorted
Finding the right combination of cages and bottles without trial and error can be challenging, so look for products selected for engineering quality and rider-focused fit rather than just shelf space. Whether you need a second or third cage mount, a saddle-mounted carrier, a frame bag for soft flasks, or hardware to secure your existing bottles against vibration and rattle, a curated selection can help you build a setup that holds up on long road rides.

Browse the components and mounting hardware collection to find cages and clamps sized for your frame, or check the broader bike accessories catalog for cage bolts, straps, and secondary retention gear mentioned throughout this guide. If you’re not sure which combination fits your specific frame and bottle choice, reach out through the site for fit support before you buy, and get your setup dialed in before your next long ride instead of finding out the hard way at mile 30.
Sources
- Expert tested: The fastest (and slowest) places to attach your water bottle
- The Best 1-Liter Bottles for Bikepacking
FAQ
How Many 16.9-Ounce Bottles Equal 1 Liter?
One liter equals about 1 liter (33.8 fluid ounces is a volume conversion), so two smaller bottles combined can approximate the capacity of a large 1L bottle. That’s why many riders running two smaller bottles get roughly the same total capacity as one large 1L bottle, just split across two mounts.
How Do You Carry a Water Bottle While Traveling?
For air travel, pack an empty rigid or collapsible bottle in checked or carry-on luggage and fill it after security. Collapsible options like the HydraPak Stow are easiest for travel since they pack flat when empty, taking up almost no bag space until you need them.
What Is the “Water Bottle Rule” for Cycling?
There’s no single official rule, but the informal guideline among long-distance riders is to carry enough capacity for roughly one bottle per hour of riding in moderate heat, adjusting upward for higher temperatures or intensity. Most riders combine two cages with a soft flask reserve to hit that target without overloading the frame.
Why Do So Many Riders Carry Larger Bottles Now?
Longer gran fondos, gravel events, and self-supported riding have pushed more cyclists toward 1L bottles and filter bottles instead of relying solely on aid stations. The shift reflects a broader trend toward self-sufficiency on long rides, where fewer resupply points make extra carried volume worth the modest aero and weight tradeoffs.
Is a Filter Bottle Worth It for Road Riding?
A filter bottle like the LifeStraw Go is most valuable on remote routes with natural water sources, since it reduces how much volume you need to carry from the start. For typical road rides with convenience stores or aid stations along the route, a standard rigid or soft bottle is usually simpler and lighter.