

Bottle Cage Bolt Torque 2–6 Nm: Read the Limiting Component
Posted by Matt Russ on 4th Sep 2026
Bottle Cage Bolt Torque 2–6 Nm: Read the Limiting Component
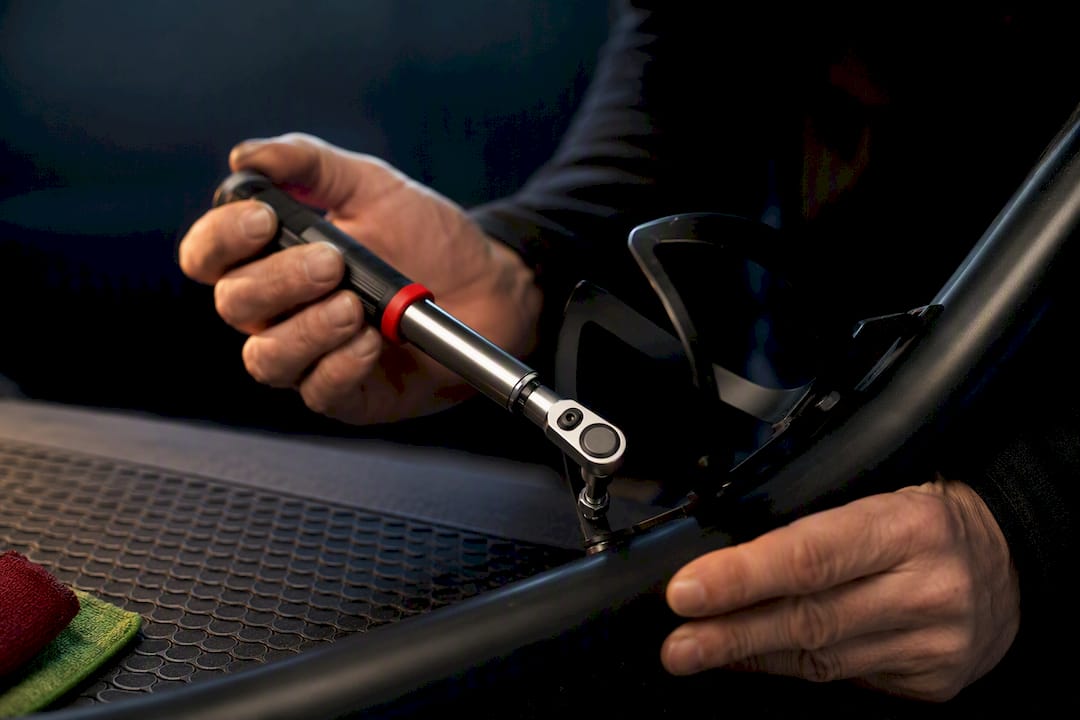
Most bottle cage bolts tighten to somewhere between 2 and 4 Nm on carbon frames or carbon cages, and 3 to 6 Nm on aluminum setups. That range is a starting point, not a rule. Your cage or frame manufacturer’s spec always wins. Hand-thread the bolt first, then finish the job with a calibrated torque wrench set to the correct number.
TL;DR:
- Most bottle cage bolts require around 2 to 4 Nm for carbon frames and cages, while aluminum setups can handle up to 6 Nm, depending on manufacturer specs.
- The limiting factor in torque is usually the threaded insert or boss, not the bolt itself, especially when dealing with carbon components.
- Use a low-range torque wrench rated for 1 to 6 Nm and tighten bolts gradually in small increments to prevent stripping or cracking.
- Carbon bottle cage mounting points often have a lower maximum torque limit, typically around 2 Nm, making adherence to manufacturer instructions critical.
- Check bolt tension after initial rides and periodically, especially on rough terrain, to prevent loosening that could lead to lost bottles or damage.
Table of Contents
- What Torque Range Should You Use for Bottle Cage Bolts?
- How Do You Install Bottle Cage Bolts With a Torque Wrench?
- What Tools Do You Need for Bottle Cage Bolt Torque?
- Are Carbon Frames and Carbon Cages Different?
- How Often Should You Check Bottle Cage Bolts?
- Why Sport Factory Pro Shop Recommends a Torque-First Approach
- What Actually Matters When Torquing Bottle Cage Bolts
- Where to Get the Right Bolts and Torque Tools
- Sources
What Torque Range Should You Use for Bottle Cage Bolts?
There’s no single magic number for bottle cage bolt torque, and that’s actually the most useful thing to understand before you pick up a wrench. The right figure depends on what the bolt is threading into, what the cage is made of, and what the manufacturer specifically calls out in its documentation.
Real-world specs cluster in a fairly tight band. Wolf Tooth lists a maximum of 4 N·m for its bottle cage bolts and recommends a light coat of grease on the threads before installation. Litespeed specifies the same 4 N·m ceiling for its M5x15mm bolts, also with grease. Meanwhile, forum consensus among mechanics who work on bikes daily lands in a similar zone, often citing 3 to 4 N·m as a practical sweet spot for most standard setups.
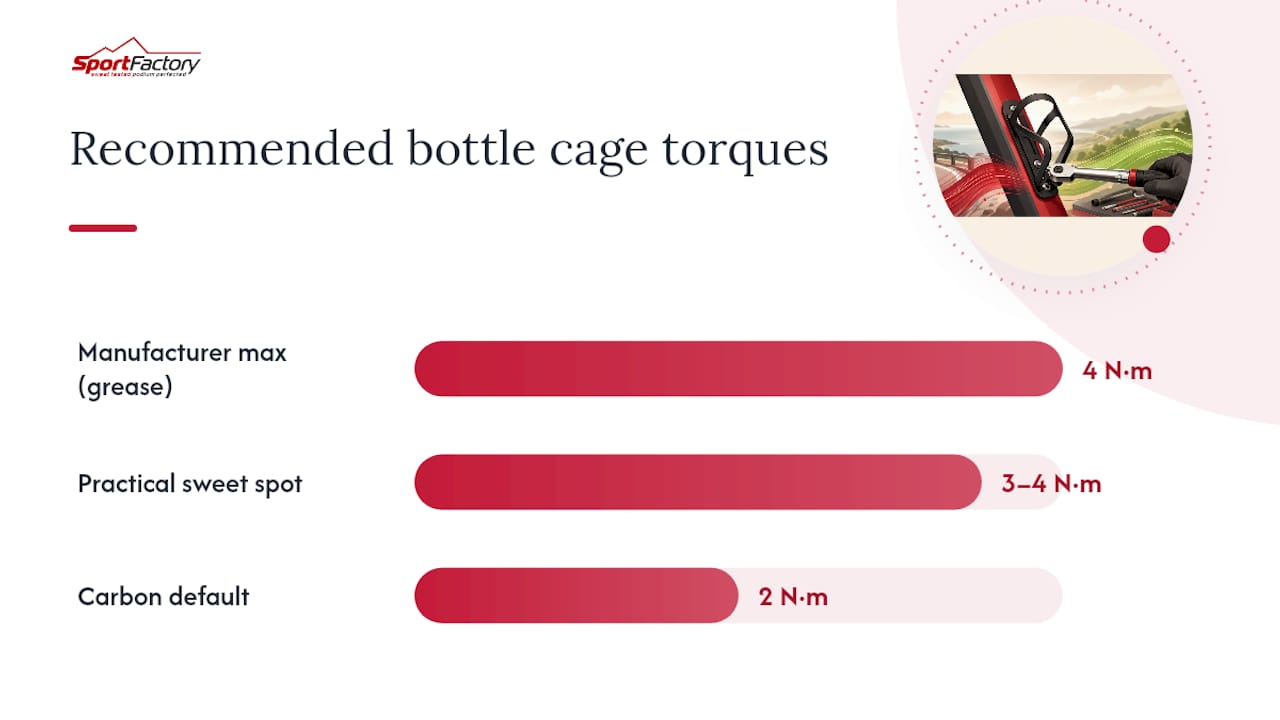
Bottle cage bolt torque values vary, but around 4 N·m often appears across major manufacturer specs as a common maximum.
The bigger variable isn’t the bolt. It’s whatever the bolt threads into. A frame with a metal insert can usually tolerate more clamping force than a bolt threading directly into a molded carbon boss. That’s the concept of the limiting component: whichever part in the assembly is weakest sets the ceiling for the whole joint, whether that’s the bolt itself, the threaded insert, or the cage material.
A few things to check when specs are missing or seem to conflict:
- Look for a torque value stamped or printed near the mounting bosses on the frame itself.
- Check the cage packaging or the manufacturer’s product page, not just the frame manual.
- When two sources disagree, default to the lower number. Under-torquing is reversible; a cracked carbon boss is not.
- If nothing is published anywhere, treat 3 to 4 N·m as a reasonable, conservative default for aluminum, and stay closer to 2 N·m for carbon.
How Do You Install Bottle Cage Bolts With a Torque Wrench?
Getting bottle cage installation right is less about strength and more about sequence. Rushing the last step is where most stripped threads happen.
- Set the cage against the mounting bosses and hand-thread each bolt until you feel resistance. If a bolt doesn’t turn smoothly by hand, back it out and realign. Forcing a cross-threaded bolt with a wrench will ruin the boss.
- Once both bolts are finger-tight and the cage sits flush, set your torque wrench to the target Nm for your frame and cage combination.
- Tighten each bolt in small increments, alternating between them if the cage has two mounting points, so the cage settles evenly rather than getting pulled crooked.
- Stop the moment the wrench clicks or signals the set torque. Don’t add “just a little more” for peace of mind.
- Give the cage a gentle tug test by hand. It should not shift or rock against the frame.
Use the bolts supplied with the cage whenever possible. They’re sized and finished for that specific application, and swapping in a longer bolt “because it was in the parts bin” risks bottoming out against the frame wall or not engaging enough threads. A thin film of grease on clean threads helps the bolt reach spec smoothly instead of galling partway there. Some riders add a small dot of medium-strength threadlocker, like Loctite 243, for cages that see a lot of vibration on rough terrain, though many carbon cage manufacturers ask you to skip threadlocker entirely.
Pro Tip: Tighten in quarter-turn increments and pause between them. A torque wrench measures the moment you reach spec, not the moment right before it, so going slow keeps you from blowing past the click on a fast, jerky turn.
What Tools Do You Need for Bottle Cage Bolt Torque?
Bottle cage bolts sit in a low range that most standard torque wrenches can’t measure accurately. A wrench built for 20 to 100 Nm chainring or pedal bolts will be next to useless here, since its scale simply doesn’t resolve numbers as small as 2 or 3 Nm.
- A small click-style or beam-style torque wrench rated for roughly 1 to 6 Nm, which covers nearly every bottle cage spec you’ll encounter.
- The correct hex bit for your bolt head, typically 3mm or 4mm on most cages.
- A calibration check every year or two if the wrench sees regular use, since drift at this low end throws off the whole reading.
- Grease for standard threads, or a small amount of medium-strength threadlocker if the manufacturer permits it.
Skip the ball-end hex driver for this job. It’s convenient for reaching bolts at an angle, but the reduced contact area on aluminum bolt heads makes it easier to strip the socket, especially on softer alloy fasteners.
Are Carbon Frames and Carbon Cages Different?
Carbon mounting points typically carry a lower torque ceiling than aluminum, and manufacturers aren’t being cautious for no reason. Tune’s documentation for carbon bottle cages lists tightening torques as low as roughly 2 N·m for some carbon bottlecage screws, with an explicit instruction to use a calibrated torque wrench. Carbon doesn’t yield gradually the way metal does. It tends to hold up fine right until it doesn’t, and there’s rarely a warning sign before a crack.
Carbon bottle cage mounting points typically have a noticeably lower maximum torque limit than aluminum bolts due to material sensitivity.
- Threaded inserts bonded into carbon layup are frequently the true weak link, not the bolt or the cage.
- If a bolt spins with unusual ease or the insert seems to move slightly under load, stop and inspect before applying any torque.
- When frame or cage documentation is unclear, treat carbon as the more conservative material and consult a qualified mechanic rather than guessing upward.
- Follow manufacturer literature to the letter here. This is one spot where “close enough” isn’t good enough.
How Often Should You Check Bottle Cage Bolts?
Bottle cage bolts loosen quietly, usually from vibration on rough roads or trails, and a lost bottle mid ride is the first symptom most riders notice.
- Check torque after the first real ride following installation, since fasteners often settle slightly as everything beds in.
- Do a hand-check every few rides on rough terrain, or monthly for road riders on smoother pavement.
- Look for early corrosion, a bolt head that spins too freely, or a cage that flexes against the frame. Any of those calls for a calibrated re-check, not just a quick retighten by feel.
Why Sport Factory Pro Shop Recommends a Torque-First Approach
The shop curates cycling hardware from manufacturers that publish real torque specs, not vague suggestions. Buying the correct bolt set and a proper low-range torque wrench beats guessing every time. If your frame or cage manual is missing, reach out to a dealer or a shop mechanic before tightening past what feels secure.
What Actually Matters When Torquing Bottle Cage Bolts
Most advice on this topic treats torque like a single fixed number you memorize and move on. That’s backwards. The number only matters in context of what it’s clamping against, and too many riders skip straight to “how many Nm” without asking what’s actually limiting that joint.
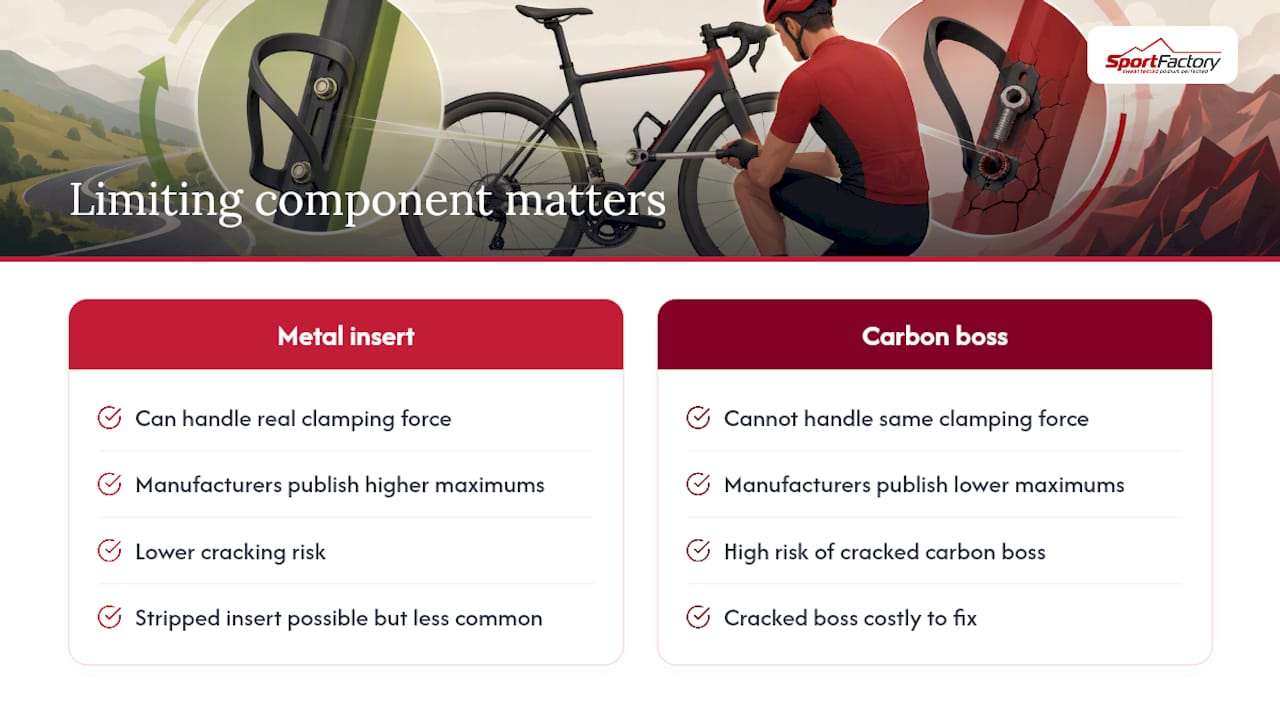
Here’s where I’d push back on the conventional wisdom: the obsession with finding the “correct” universal figure misses the real skill, which is reading the joint itself. A bolt threading into a metal insert on an aluminum frame can handle real clamping force. That same bolt threading into a carbon boss with no insert cannot, even if it’s the identical bolt and identical cage. Manufacturers publish different maximums for exactly this reason, and generic torque charts flatten that distinction into a single misleading average.
If you take one thing from this article, make it the habit of checking the limiting component before you check the number. A $30 low-range torque wrench and five minutes reading your frame’s documentation will save you from a cracked carbon boss or a stripped insert, both of which cost far more to fix than they ever save in convenience.
— Matt
Where to Get the Right Bolts and Torque Tools
The store stocks hardware this whole process depends on, without pushing you toward guesswork or a mismatched bolt from a random parts bin. The cycling gear and accessories selection covers bottle cage bolt sets sized correctly for common cage and frame combinations, along with low-range torque wrenches built for the 2 to 6 Nm window this article covers, plus washers and mounting hardware for cages that need them.

Getting torque right isn’t about owning expensive tools. It’s about owning the right ones for this specific job, since a wrench calibrated for crank bolts will lie to you at 3 Nm. Browse the current cage hardware and torque wrench lineup at Sportfactoryproshop, match the bolt set to your frame’s threading, and install your next cage to spec instead of to feel.