


Cycling Foot Pedal Interface Adjustment for Optimal Performance
Posted by Matt Russ on 27th Sep 2018
Of three points of contact on a bicycle (saddle, handlebars, and pedals), the pedals are the most dynamic. Unfortunately most riders do not pay much attention to cleat position or foot/pedal interface, which can be adjusted in five different parameters: fore/aft, rotation, medial/lateral, with wedges for foot biomechanics (high arch or flat foot), and shims for leg length discrepancies. Getting all these parameters adjusted optimally can be complicated. It requires knowledge of equipment and also the biomechanics and kinesiology of the human body. Above all a proper fit process should entail detailed communication and interaction between the cyclists and the fitter as to what feels the best. There is no automated fit process that can substitute fitter experience or rider feedback, and fitting is a process that often should be incremental.
Properly adjusted, the foot/pedal interface can prevent injury, increase power, and improve comfort; sometimes drastically. Yet, it is often the most over looked or disregarded part of the fit process. Fitters and cyclists will often eyeball their cleat placement with little regard to proper placement. Unfortunately if you had your cleats installed at a bike shop while you wait they probably told you they put them in a "neutral" position if they told you anything at all. Although neutral may sound pretty good it is usually far from it.
The adjustment process should initiate with rider observation on the bike, analysis and measurement of biomechanics, installation and positioning, re-observation on the bike, and re-adjustment. This in and of itself can take a lot of time. After the athlete has left the studio it may also require slight adjustment after the cyclists puts some road miles on the fit.
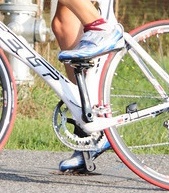
Fore/Aft adjustment- There are a very great number of cycling shoe brands and models, each with their own engineering philosophy on how to make the “best” cycling shoe. There are about a half dozen popular brands of pedals with various cleat/pedal designs. Starting with fore/aft adjustment we use the first and fifth metatarsal heads as our anatomical markers, or the two widest points of the forefoot. The center of the pedal spindle should be located somewhere between these two points with mechanical advantage of the plantar flexors towards the fifth (widest point at the outside of the forefoot). Many cleats have the center point of the cleat marked but some do not. I begin by marking the first and fifth metatarsal head on the shoe.
Rotation Angle/Float adjustment- Float is the amount of movement or play in degrees that the cleat/pedal system allows. Float is often deemed “good” or “bad” but is in fact a necessary part of the pedal stroke as the tibia must rotate slightly on each pedal stroke. By locking the foot in a position that it is not designed for, force is immediately transferred to the joints of the ankle, knee, and hips. This in and of itself can cause an overuse injury; usually at the knee. I like to begin the process of adjusting for rotation by observing the athlete walking and standing to determine their neutral or natural position. It is not unusual to observe asymmetry when standing such as one hip higher than the other, one foot externally rotated more than the other, or one arch higher than the other. We then try to match the neutral position on the bike to this asymmetry. With less float in the pedal system the accuracy of the rotation adjustment must be precise. If the foot is up against the stopping point of the float, or the foot feels like it is being held in an unnatural position when pedaling, it probably needs to be adjusted.
Varus/Valgus Adjustment- There are several ways to adjust for varus/valgus of the forefoot, all of which have the objective of creating a stable platform that transfers energy more evenly across the foot. These include under the cleat wedges, in the shoe wedges, or the use of tuneable footbeds. Each system has pluses and minuses and I like to assess the athlete before determining which system, or what combination of systems to use. It is important to note that some shoes already have varus built into their design. Although the vast majority of the population has some degree of varus (first metatarsal head is higher than the fifth), some cyclists do have a high stiff arch causing valgus. In this case a neutral shoe that does not have any varus built in is appropriate. By observing the client walking and by using a forefoot goniometer we can determine the degree of varus/valgus and adjust/wedge accordingly. Riders are often amazed at what a difference this can make as it removes a lot of extraneous "slop" from the pedal stroke.
Stance Width or Q Factor- Unfortunately stance width adjustment is more limited and some cyclists fall outside of the range of adjustment allowed by the pedal/cleat system; especially if they are larger individuals with wider hips or very small with narrow hips. Pedal manufacturers have made some headwind in this area by offering different pedal spindle lengths. There are also some interventions with additional pedal spacers for very large individuals. Speedplay does make a kit that allows a wide selection of pedal spindle lengths. The goal of stance width adjustment is essentially to get the foot, knee and hip aligned or to get the foot under the knee and reduce medial/lateral movement of the knee. This is the most leveraged position to produce power and along with varus/valgus adjustment can make significant increases in performance. Although “knees out” pedaling is never desirable it is important to note that some cyclists cannot achieve perfect pedal alignment due to their biomechanical structure, injury, or both. Stance width alignment can be measured using a self-leveling laser to observe the alignment of biomechanical markers at the hip, knee, and foot.
Leg Length- when adjusting for leg length discrepancies “first do no harm.” These can be hard to diagnose. Leg length discrepancies of some sort are common and in most cases do not require compensation; especially if under 5mm. It is important to diagnose a leg length discrepancy as functional (such as one hip higher than the other) or structural (a bone such as the femur longer than the other). Incorrectly adjusting for a leg length discrepancy can actually promote injury. Shims can be placed under the cleat usually compensating for half the length of the structural discrepancy. Careful observation of hip movement, especially from the rear is warranted, but the “gold standard” for diagnosis is a standing scanogram x-ray.
The foot/pedal interface is actually the last thing we address in a fitting. If the saddle and cockpit are off there is no point in moving on to the feet. It is important to note that learning to properly fit for individual biomechanics and/or injury takes years of experience and training; and some clinical experience as well. There are more “automated” fit systems which are used as sales tools as well as fitting systems. These systems are designed for ease of use and training in a retail setting, and do not necessarily give a superior fit. Retail settings tend to have frequent employee turnover. Make sure your fitter has the experience and training necessary to assist you, especially in the case of an overuse injury. If you are experiencing an injury the first step in the process should be a diagnosis and treatment from a doctor or therapist. Once the injury has been properly treated schedule an appointment with an experienced and trained fitter to ensure the fit of your bike is not the root cause.