

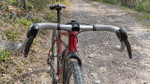
Handlebar Flare for Gravel: How Much Do You Need?
Posted by Matt Russ on 21st Oct 2026
Handlebar Flare for Gravel: How Much Do You Need?

Flare is the angle at which the drops of a gravel handlebar splay outward compared with the tops and hoods. For most gravel riders, 12° to 16° is the sweet spot. It gives you extra control in the drops without pushing your levers or wrists into awkward positions on the hoods. Go lower if you race and care about a road-like position. Go higher if you ride loose, technical descents or carry a lot of gear. The rest of this guide shows how to decide, and what to check before you buy.
TL;DR
- Flare is measured in degrees. Moderate flare of roughly 12° to 16° is the versatile standard for mixed-terrain riding.
- More flare means more steering leverage and stability in the drops, plus more room between the drops for bags. It also makes the hoods position less natural if you overdo it.
- Racers usually do better with less flare. Bikepackers and endurance riders usually benefit from more.
- Check lever clamp size, brake type and race rules before you swap bars. Flare affects fit, not just feel.
Table of Contents
- What handlebar flare actually means
- Why flare helps off pavement
- How much flare for your kind of riding
- Why more flare is not always better
- Racing rules: the UCI hood rule
- Compatibility and safety checks before you swap bars
- Fitting the bar to the rest of the bike
- Our view on flare
- Find your bars at The Sport Factory
- FAQ
- Sources
What handlebar flare actually means
A road drop bar is close to parallel from the hoods to the ends of the drops. A flared gravel bar kicks the drops outward. The drops end up wider than the hoods, sometimes by a lot: Cyclingnews notes that some designs measure around 54cm at the drops against 42cm at the hoods.
You will see flare listed as an angle, such as 12°, 17° or 24°. A few degrees is subtle. Extreme designs go as high as 45°, though that is well outside what most riders need.
Two things are easy to confuse with flare:
- Width: the measurement at the hoods or tops, usually the number the bar is sold by. A 42cm bar with 17° of flare is wider in the drops than a 42cm bar with 6°.
- Outsweep: a gradual curve of the bar ends. Flare and outsweep both widen the drops, but they feel different in the hand, so compare shapes as well as numbers.
Why flare helps off pavement
When the trail gets rough, you move your hands to the drops. A wider grip there gives you more leverage over the front wheel. That is the main reason flare exists. According to Cyclingnews, the main benefit of added flare is steering leverage and stability on technical descents.
There are practical gains too:
- Control at lower speeds. Slow, loose or washboarded descents are where a wider drop position steadies the bike.
- More hand room. The drops are less cramped, so long days in the drops feel less tiring.
- Bag clearance. A wider gap between the drops leaves room for a front roll or bikepacking bag. BikeRadar points to the extra space for luggage as a real benefit.
If you plan to carry gear, pair your bar choice with the right storage. Our bike bags, panniers and racks collection and the Blackburn Outpost frame bags, available in three sizes, are good places to start.
How much flare for your kind of riding
The right amount depends less on the bike and more on how you ride it. Here is a practical starting point.
| Riding style | Typical flare | What you gain | What to watch |
|---|---|---|---|
| Gravel racing, fast and mostly smooth | Low, 0° to about 10° | Road-like hoods position, better aerodynamics | Less leverage on rough descents |
| Mixed gravel and pavement, day rides | Moderate, 12° to 16° | Balance of control and a natural wrist angle | Few downsides for most riders |
| Technical trails, rough descents | 17° to about 24° | Strong leverage and stability in the drops | Lever angle, reach to the brakes |
| Bikepacking and loaded touring | Moderate to high | Room for bags, comfort over long days | Check bag fit against the bar width |
These ranges are our rule of thumb, built on the reporting below, not a standard. Individual bars differ in shape, so a 16° bar from one maker can feel different from another.
Racers: keep it closer to road
Cyclingnews describes a clear split between gravel racing and adventure setups. Racers often prefer narrower, less flared bars to protect aerodynamic efficiency and keep a familiar wrist angle on the hoods. If you spend most of a race on the hoods or the tops, that is where your comfort lives. Many gravel racers also run low-profile tires, so a related read is our guide to 35 to 40mm gravel tires for mostly paved riders.
Endurance and bikepacking riders: go wider
The same source notes that endurance and bikepacking riders tend to favor stability and comfort. They choose wider, more pronounced flares for leverage on loose, technical descents at lower speeds. A loaded bike is heavier and steers differently, so the extra leverage matters more.
Why more flare is not always better
It is tempting to assume that the most flare gives the most control. It does not always work out that way. In a long-term review, Gravel Cyclist praised a bar because the levers can be set up in a traditional position, so the hoods feel just like they do on a non-flared bar. That is the point. A good flared bar widens the drops without ruining the hoods.
With extreme flare, typically above about 20° to 25°, the levers can end up at awkward angles. That makes them harder to reach from the hoods. Before you commit to a very wide bar, check that its geometry keeps your wrists in a natural line on the hoods.
The transition from tops to hoods to drops matters as much as the number of degrees. The Lunch Ride stresses that gravel bars are part of a cockpit, not a standalone part. It suggests looking for a shallow drop so the brake levers stay easy to reach when you are descending in the drops.
One more point on braking. Riders on forums often note that you get more mechanical advantage from the drops than from the hoods, because only your lower fingers have leverage on the hoods. That is another reason flare can help: it makes the drops a more inviting place to be when you need to brake hard.

Racing rules: the UCI hood rule
If you enter sanctioned events, flare is not the only thing to check. The UCI has introduced a rule on turned-in brake hoods. Per Gran Fondo Daily News, the centre plane of the brake hood body must align with the centre plane of the drop area, with a permitted maximum inclination of 10 degrees. The rule is being enforced at Gran Fondo and Gravel Worlds.
This matters for flared bars because riders sometimes rotate hoods inward to make the hoods position feel better. If you race under UCI rules, confirm your setup with the event organizer before you travel. Rules change, so read the current regulations for your event.

Compatibility and safety checks before you swap bars
A new handlebar is a safety-critical part. Treat the swap like a small project, not a quick bolt-on.
- Clamp diameter. Drop bars use a larger tube where the levers clamp. According to BikeQuiver, lever bands are designed around 23.8mm and typically accommodate up to about 24.2mm, so modern drop-bar levers fit modern drop bars. Flat bars use 22.2mm, so do not mix the two standards.
- Cable pull. Road short-pull and mountain long-pull systems are not interchangeable. A mismatch gives you a mushy or grabby brake feel, which is unsafe on a descent.
- Hydraulic systems. Hydraulic lines stay with their brand fluid family. Mineral oil and DOT systems are not interchangeable, so do not swap levers between families.
- Stem clamp. Make sure the bar’s center section matches your stem’s clamp diameter. Bar and stem standards vary, so confirm the numbers from both makers.
- Torque. Use a torque wrench and follow the maker’s values, especially on carbon bars.
- Bar tape and cable length. A wider bar may need longer housing or cables. Check for slack before you ride.
If you are not sure about brake bleeding, cable routing or carbon clamping, have a qualified mechanic do it. Many shops use workshop management software to track parts and jobs, which makes it easier to book a proper handlebar swap and keep a record of the work. If you need new levers or pads with the bar, browse brake levers, pads, calipers and rotors. If you like bar-end controls for bikepacking, see our bar end shifters.
Fitting the bar to the rest of the bike
Flare changes where your hands sit, which changes how the whole bike feels.
- Width at the hoods. Start with your shoulder width as a guide, and then consider whether you want a narrower, road-like feel or a wider one. Flare adds width at the drops without changing the hoods.
- Lever angle. Set your levers so your wrists are straight on the hoods. Then check that you can reach the brakes from the drops. If you can’t do both, the flare is likely too aggressive for you.
- Tires. Wide bars pair naturally with wide tires. If you plan to run a bigger tire, check the frame first with our gravel tire clearance test fit checklist. When you are ready, our gravel and cross tires are one click away.
- Bags. If you will mount a front roll, test it with the cables and the flare in place. More flare gives more room, but your bag still has to clear the levers and your knees.
A good test: after the swap, ride a familiar descent twice, once on the hoods and once in the drops. Note where you feel steadier, and where you reach for something that isn’t there. Small changes, like rolling the bar a few degrees or moving the levers, often fix it.
Our view on flare
We sell components to riders who care about how their bikes work, and a handlebar is one of the parts where a small change has a big effect. Here is where we land.
Most people who ask us about flare are really asking about comfort and control. They want to feel confident when the surface turns loose, and they do not want to give up the position they already like on the hoods. That is why we steer riders toward moderate flare first. It delivers most of the benefit, and it is forgiving when you tweak lever position.
We also think riders should match the bar to the event. A rider lining up for a fast gravel race has different priorities from someone loading a bike for a three-day trip. Neither is wrong. The mistake is buying the most extreme shape because it looks the part.
Finally, treat the bar as one piece of a system with the stem, levers, tape and bags. If one part is off, the whole cockpit feels off. Start with the problem you want to solve, such as shaky descents, sore hands or no room for a bag, and choose the bar that addresses it.
— Coach Matt
Find your bars at The Sport Factory
When you have decided how much flare suits your riding, browse our handlebars and aerobars and our drop bars, curated from brands selected for engineering quality and rider-focused features. You can also look through our wider components range to pair the bar with levers, pedals and more. If you ride aerobars for triathlon too, our guides on aero bar width and comfort in the aerobars may help.
FAQ
How much flare should a gravel handlebar have?
For most riders, 12° to 16° is a good starting point. It is considered the moderate, versatile range for mixed terrain. Racers can go lower, and riders on technical descents or loaded bikes can go higher.
Is a flared handlebar worth it on a gravel bike?
If you ride rough or loose terrain, usually yes. The wider drops give you more leverage and stability when descending, and more room for bags. If you ride mostly smooth gravel or pavement, a standard road bar is often fine.
Can I put a flared bar on my road bike?
Often you can, as long as the clamp size matches your stem and your levers fit the bar. Drop-bar levers are designed around 23.8mm clamps. Check your brake type and cable pull as well, and ask a mechanic if you are unsure.
Are flared bars legal in gravel races?
Flared bars are widely used, but sanctioned events can have rules about equipment. The UCI limits how far brake hoods can be turned in, with a maximum of 10 degrees. Check the current rules for your event before you race.
Sources
- Buyer’s guide to gravel bike handlebars, BikeRadar
- Best gravel handlebars, Cyclingnews
- Zipp Service Course SL70 XPLR Handlebar long-term review, Gravel Cyclist
- Best Gravel Bike Handlebars, a Buyer’s Guide, The Lunch Ride
- How to improve braking with hands on hoods, Bicycles Stack Exchange
- New UCI ban on turned-in brake hoods, Gran Fondo Daily News
- Brake Lever Standards: Clamps and Cable Pull, BikeQuiver