

Measure First: 35–120 ml of Tubeless Sealant Per Tire
Posted by Matt Russ on 2nd Sep 2026
Measure First: 35–120 ml of Tubeless Sealant Per Tire
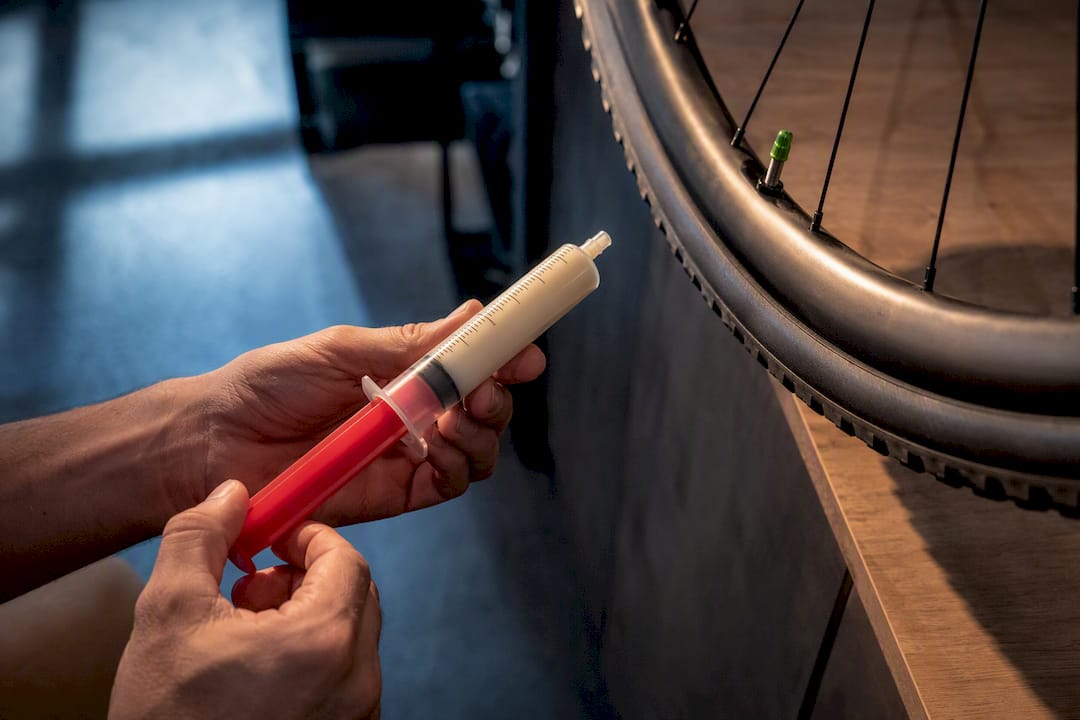
Start with a moderate amount per tire that increases with tire width: smaller amounts for road tires, more for gravel, even more for standard mountain bike tires, and the most for fat bike tires. These are per-tire starting points, not fixed rules, and you’ll adjust them based on casing, climate, and how often you top up. Grab a graduated cup or an injector from Sportfactoryproshop before you start so you’re measuring instead of guessing.
TL;DR:
- Sealant amounts should be adjusted based on tire width and internal volume, with wider tires requiring more liquid for effective coverage.
- Use manufacturer-recommended charts or tools like injectors and graduated cups to measure sealant accurately and avoid overfilling or underprotecting.
- Sealant generally needs refreshing every 1 to 3 months depending on climate, storage conditions, and tire porosity, with signs of dryness indicating the need for resealing.
- Excess sealant adds weight and mess without increasing puncture protection, so removing surplus is advisable if overfilled.
- Proper disposal involves drying excess sealant and recycling containers, preventing environmental harm from liquid latex components.
Table of Contents
- What Is the Right Tubeless Sealant Amount for Your Tire Size?
- How Do You Measure and Add the Right Amount?
- When Should You Top Up or Replace Your Sealant?
- Can You Put Too Much Sealant in a Tubeless Tire?
- How Do Casing, Inserts, and Climate Change Your Baseline?
- What Should You Check Before Adding More Sealant?
- How Should You Dispose of Excess or Old Sealant?
- Does Sealant Volume Change Between Tire Brands?
- What Does Sport Factory Pro Shop Recommend as a Default?
- Where Can You Buy Sealant Supplies and Starter Kits?
- Sources
What Is the Right Tubeless Sealant Amount for Your Tire Size?
The correct tubeless sealant amount depends almost entirely on tire width and internal volume. A skinny 25mm road tire has a fraction of the interior surface area of a 2.6-inch trail tire, so it needs a fraction of the liquid to coat that surface and still leave enough spare volume to plug a hole. BikeCalcs builds its dosing logic around exactly this relationship: sealant has to coat the whole casing wall, not just puddle at the bottom, and wider tires simply have more wall to cover.
Manufacturer charts remain the most reliable labeled source for the sealant you actually bought. Stan’s publishes specific ml recommendations by tire size, and Trek’s TLR reference chart lists granular values across 26-inch, 27.5-inch, 29-inch, and 700c wheel sizes. When a brand’s own chart is available, use it over any generic rule of thumb.
Here’s a quick reference you can use when setting up or refreshing tires:
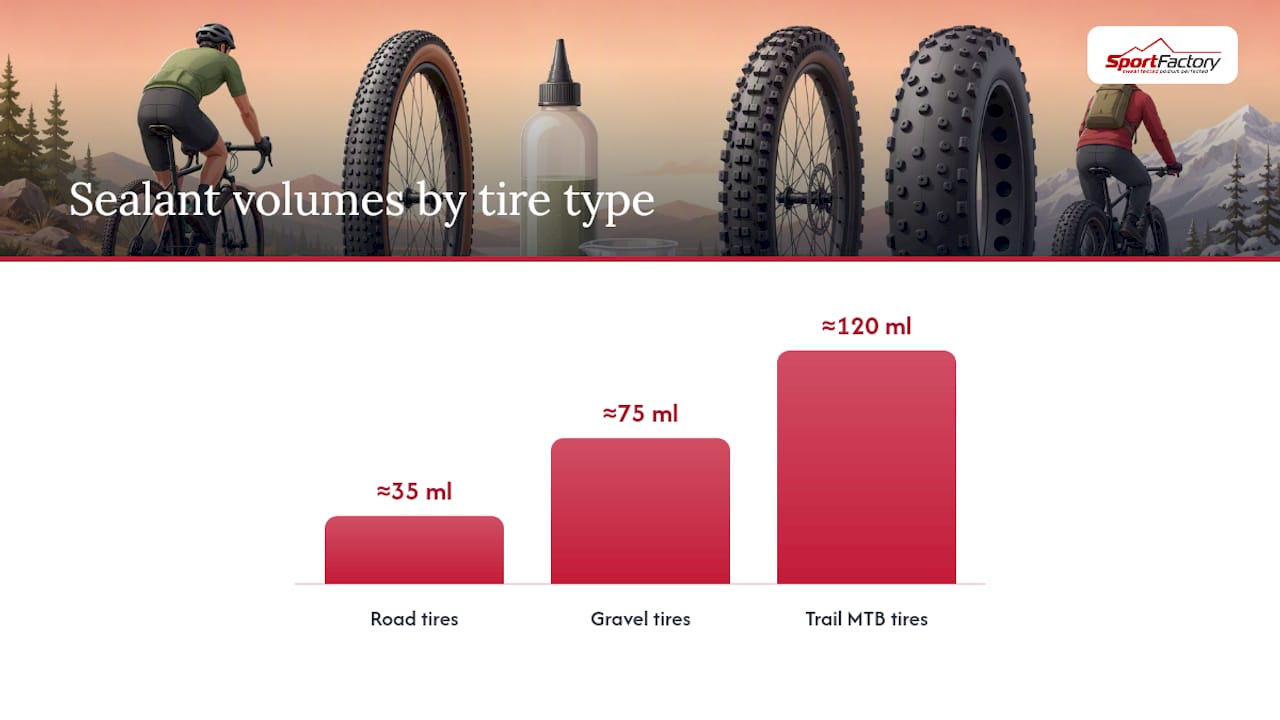
A general guideline is to increase sealant volume with tire width and type, from small amounts for road tires, moderate for gravel, higher for mountain bike tires, to the most for fat bikes.
Start near the middle of each range rather than jumping straight to the top number. Independent testing from BikeTestReviews suggests roughly 35 ml for road, 75 ml for gravel, and 120 ml for a typical trail mountain bike tire as sensible starting points, with adjustments coming later based on how the tire actually performs. If your sealant bottle or the tire manufacturer lists a different number, follow that label first. The chart above is a strong starting reference, not a substitute for printed guidance.
How Do You Measure and Add the Right Amount?
Guessing sealant volume by pouring straight from a bulk bottle is how riders end up overfilled or underprotected. Three tools solve this, each with tradeoffs.
- Sealant injector: Attaches to the valve stem through a removed valve core, letting you add exact volumes to an already-mounted, inflated tire without breaking the bead. Best for top-ups and mess-free dosing.
- Graduated measuring cup: Cheap and precise for pouring sealant into a tire before you seat the bead. Works well during initial setup but requires the tire to still be partly off the rim.
- Single-tire dose bottles: Pre-measured squeeze bottles sized for one tire application. Convenient for consistency, though less flexible if your tire size falls outside the bottle’s intended range.
Step-by-step process:
- Mount the tire on the rim, leaving one section of bead unseated, or plan to inject through the valve.
- Remove the valve core if injecting through the stem.
- Measure your target volume using the chart above, checking it at eye level for accuracy.
- Add the sealant, either pouring through the open bead section or injecting through the stem.
- Reinstall the valve core, finger-tight plus a small turn. Overtightening can crack the valve seat.
- Inflate to seating pressure and spin the wheel to distribute sealant across the casing.
- Check the bead line and valve base for leaks or weeping.
Pro Tip: Keep a small squeeze bottle of extra sealant labeled by tire size in your workshop. It saves you from re-measuring every time you do a top-up and keeps you from eyeballing a “close enough” pour.
When Should You Top Up or Replace Your Sealant?
Sealant doesn’t last forever once it’s inside a spinning tire. Latex-based formulas dry and clump over time, and how fast that happens depends heavily on where and how you ride.
- Hot, dry climates: Check and top up every 1 to 2 months. Heat accelerates evaporation dramatically.
- Cool, damp climates: You can often stretch to 3 to 6 months between checks.
- Storage conditions: Bikes stored in garages or sheds that swing in temperature dry out sealant faster than bikes kept indoors.
BikeCalcs notes this partial refresh is usually enough to restore protection since some residual sealant remains inside as dried latex or unreacted liquid. If you find the tire almost bone dry with crusty latex flakes rattling around, that’s a sign to do a full reseal instead of a top-up: pull the tire, clean the interior, and start fresh.
Two quick checks tell you where you stand. The slosh test involves spinning the wheel and listening for liquid movement; silence usually means it’s dried out. The bead check means peeling back a section of tire to visually inspect for wet sealant versus dried rubber crumbs. Dry, hot conditions can reduce sealant to unusable residue within a matter of weeks in extreme cases, so riders training through summer heat should check more often than the general 1 to 2 month guidance suggests.
Can You Put Too Much Sealant in a Tubeless Tire?
Yes, and it’s a more common mistake than most riders realize. More sealant does not mean proportionally more puncture protection. Once you’ve adequately coated the casing and left spare volume to plug a hole, additional liquid mostly just adds weight and moves around inside the tire without doing much more work.
- Rotational weight: Extra grams at the rim’s outer edge affect acceleration and handling more than the same weight would elsewhere on the bike, which matters more to competitive riders chasing marginal gains than casual commuters.
- Sloshing and balance: Overfilled tires can feel slightly uneven at speed, especially on lighter road and gravel setups.
- Mess and contamination: Excess sealant that weeps through the bead can contaminate rim brake surfaces or disc rotors, creating a slippery mess that’s hard to clean off properly.
- Bead seating difficulty: A tire flooded with too much liquid can make it harder to get a clean seal when first mounting, since the excess volume interferes with an even bead seat.
If you’ve overfilled, you can fix it. Deflate the tire, rotate the valve to the bottom, and let excess sealant pool near the stem. Remove the valve core and draw out the extra volume with a syringe or injector, then remeasure against the chart and reinflate.
How Do Casing, Inserts, and Climate Change Your Baseline?
The chart above assumes a fairly standard setup. Real-world tires and conditions push those numbers in either direction.
- Casing porosity: Lightweight, thin-casing race tires (think ultralight XC or road tires built for low rolling resistance) are more porous and weep sealant faster, so they typically need 10 to 20% more than a heavier casing at the same width.
- Tire inserts: Foam inserts like those used in aggressive trail and enduro setups can absorb a portion of your sealant volume. Account for this by adding slightly above the standard baseline, particularly with open-cell foam designs that soak up more liquid than closed-cell types.
- Climate and storage: Riders in arid climates or storing bikes in hot garages should expect faster drying and may want to start at the higher end of their tire’s range, then check more frequently.
- Tubeless-specific casings: Tires designed from the ground up for tubeless use (rather than tubeless-compatible clinchers) tend to seal more consistently with less sealant since the casing itself is less porous.
Pro Tip: If you’re running an insert and a lightweight race casing together, don’t just split the difference. Start at the top of your tire’s range and check the slosh test after two to three rides rather than waiting the full standard interval.
For a deeper look at matching casing choice and insert type to your terrain, Sportfactoryproshop’s guide on tire sidewall protection walks through how casing construction interacts with sealant performance and puncture resistance.
What Should You Check Before Adding More Sealant?
A slow leak doesn’t always mean you need more liquid. Sometimes it means something else is wrong, and pouring in more sealant just delays the real fix.
- Check the bead seat by looking for gaps or uneven seating along the rim wall where air could be escaping past the sealant’s ability to plug it.
- Inspect the valve core for a loose fit or worn seal. A slow leak here looks identical to a tire problem but has nothing to do with sealant volume.
- Examine the rim tape for wrinkles, punctures, or lifted edges, especially near the valve hole where tape often fails first.
- Look for casing cuts large enough that sealant can’t bridge the gap. Anything wider than a small nail hole usually needs a patch or plug, not more liquid.
- Decide on repair versus top-up: small punctures that sealant is actively working on just need time and a spin of the wheel; anything mechanical (valve, tape, bead) needs a fix, not more fluid.
Run this checklist before adding a single extra milliliter. It saves you from chasing a mechanical problem with liquid that was never going to solve it.
How Should You Dispose of Excess or Old Sealant?
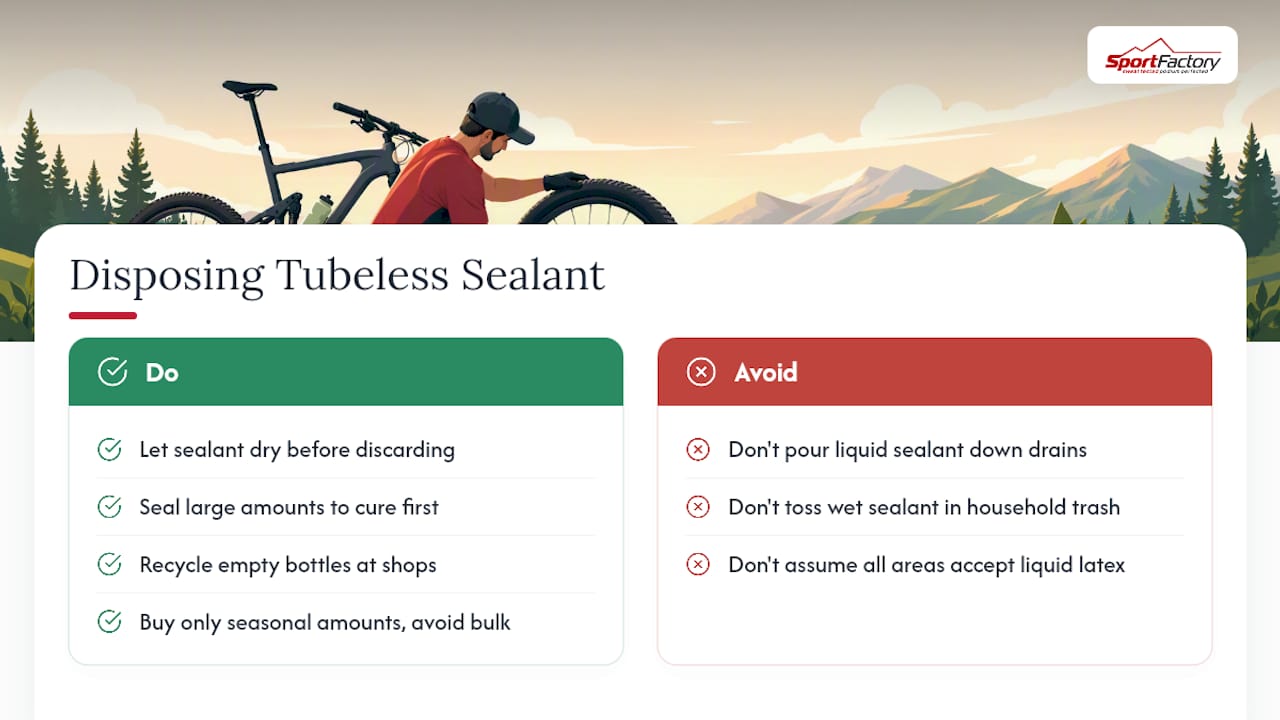
Old and excess sealant isn’t something to pour down a drain or toss in general household trash without a second thought. Latex-based sealants contain ammonia and preservatives that most municipal wastewater systems aren’t designed to filter efficiently, and dried sealant residue doesn’t break down the way natural rubber does.
The simplest approach is to let excess sealant dry out completely inside an old container or a disposable cup, since dried latex sealant becomes an inert solid that’s safe for regular trash disposal in most areas. If you’re draining a large amount from an overfilled tire, pour it into a sealed container and let it cure over a few days before discarding rather than trying to dispose of it while still liquid.
Some sealant manufacturers and bike shops accept old sealant containers for recycling, particularly the plastic bottles themselves once emptied and rinsed. Check with your local municipality’s hazardous waste guidelines if you’re disposing of larger quantities, since rules vary by location and some areas classify liquid latex products differently than dried residue. When in doubt, letting it dry first and disposing of the solid form is the lower-risk option almost everywhere.
Buying only what you need for a season, rather than a bulk gallon that sits half-used for years, also cuts down on how much you’re eventually disposing of. It’s a small habit that reduces both waste and the temptation to overfill tires just to use up sealant before it degrades in the bottle.
Does Sealant Volume Change Between Tire Brands?
Sealant dosing is driven more by tire width and volume than by brand, but a handful of brand-specific quirks are worth knowing. Tires built specifically as tubeless-ready from the casing up, rather than tubeless-compatible clinchers adapted to run without a tube, tend to seal more predictably with less sealant because the weave and coating are less porous to begin with.
Wider bead seat designs, like those found on many modern gravel and mountain rims, can also affect how evenly sealant distributes during the initial seating spin, occasionally requiring a slightly higher starting dose to guarantee full coverage on the first setup. If you’re running a specific sealant brand alongside a specific tire brand, check whether either publishes a combined chart, since some sealant makers test their formulas against popular tire models and adjust recommendations accordingly.
The safest approach when mixing brands is to treat the tire’s width and volume as the primary variable, using the quick-reference chart earlier in this guide, and only deviate from that baseline when a manufacturer explicitly publishes a different number for your exact tire model. Community discussion threads, including long-running forum debates about sealant volume for 29-inch tires, show riders land on a wide range of personal preferences. That variance is normal. Start from the published chart, then adjust after a season of real riding.
What Does Sport Factory Pro Shop Recommend as a Default?
Our practical defaults track closely with the chart above: 35 ml for road, 75 ml for gravel, and 110 to 120 ml for standard trail mountain bike tires, landing at the tested middle ground rather than the maximum published figures. We stock injectors and graduated bottles specifically because eyeballing a pour is the single biggest cause of overfill and underfill complaints we hear about. If you’re setting up a new tire with an insert or a lightweight race casing, our tire sidewall protection guide walks through how casing choice changes your sealant math. We curate gear from brands that publish clear, labeled guidance, which makes dosing far less guesswork for riders switching setups mid-season.
— Matt
Where Can You Buy Sealant Supplies and Starter Kits?
Getting the tubeless sealant amount right starts with having the right tools on hand, not just the right numbers memorized. A dedicated injector or a single-tire-sized bottle removes the guesswork that leads to overfilled, sloshy tires or underprotected ones that seal poorly on the first ride.

Sportfactoryproshop stocks measuring injectors, graduated cups, and pre-sized sealant bottles built for exactly the dosing ranges covered in this guide, so you’re not stuck pouring from a bulk jug and hoping for the best. Whether you’re setting up a fresh gravel wheelset or refreshing a mountain bike tire before race season, having a properly sized tool on your bench saves both sealant and cleanup time. Visit Sportfactoryproshop to browse starter kits and measuring tools, and get your next tire setup dialed in on the first try instead of the third.
Sources
- Tubeless Sealant Calculator — BikeCalcs
- How Much Sealant Should I Add To My Tires? – Stan’s
- How Much Tubeless Sealant Do You Need? — BikeTestReviews