

Aerobar Fit in Six Steps: Bench to Road Setup, Torque to Spec
Posted by Matt Russ on 9th Sep 2026
Aerobar Fit in Six Steps: Bench to Road Setup, Torque to Spec
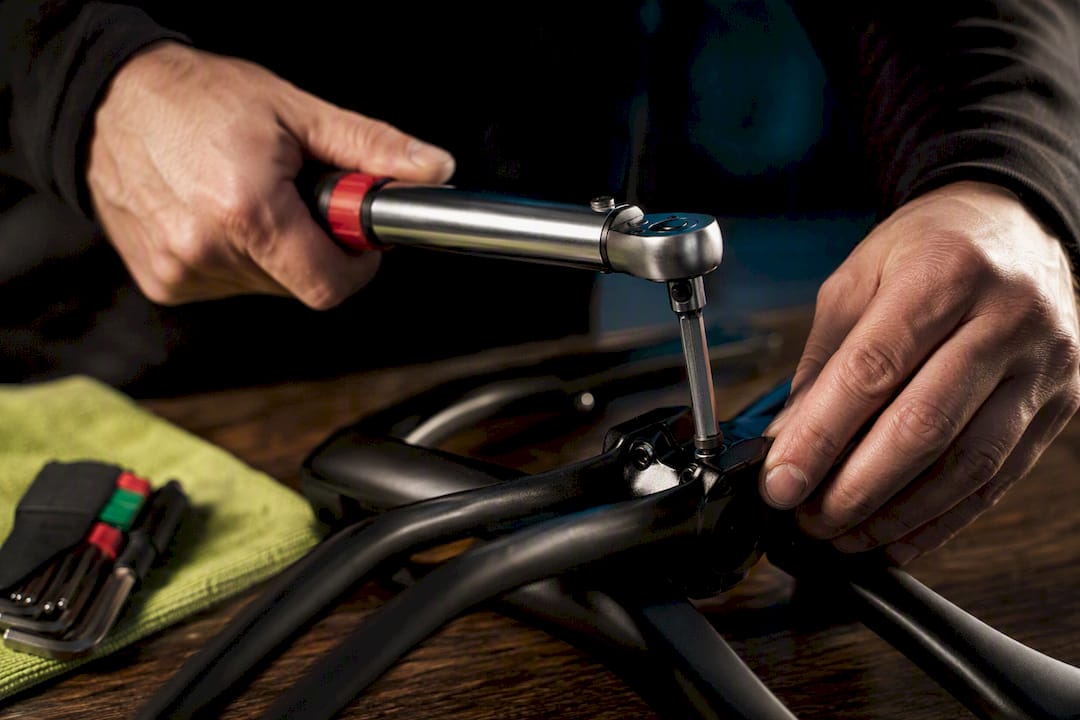
Yes, clip-on aerobars will fit most round 31.8mm handlebar sections, but only when you clamp on a rated section, torque bolts to the manufacturer’s specs, and set pad height to match your comfort and race goals. The three rules that matter most: confirm compatibility before you buy anything, use a torque wrench instead of guessing, and start conservative on stack and reach before chasing an aggressive aero position.
TL;DR:
- Confirm handlebar compatibility by measuring a straight, round 31.8mm section and avoid forcing clips onto tapered or wing-shaped bars.
- Use a torque wrench to tighten all fasteners to manufacturer specifications, and recheck fasteners after 50 to 100 miles of riding to ensure safety.
- Set pad drop based on vertical distance from saddle midpoint to elbow pads, aiming for conservative (0-8cm), typical (8-10cm), or aggressive (10-20cm) ranges depending on rider flexibility and race goals.
- Adjust reach and tilt gradually, starting shorter and with slight nose-up tilt to avoid wrist pain and optimize comfort without sacrificing aerodynamics.
- Test new setups on a trainer first, then gradually increase ride duration and terrain complexity to validate comfort and handling before race day.
Table of Contents
- Aerobar Fit Guide: Bench Checklist and Installation Steps
- How Do You Set Stack, Reach, and Tilt on Aerobars?
- Choosing Arm Pad Spacing and Extension Rotation
- Torque, Carbon Clamps, and Safety Checks You Can’t Skip
- What Do Studies Say About Comfort vs. Aero Position?
- How Do You Test and Validate a New Aerobar Setup?
- Where to Find Aerobar Parts and Fitting Tools
- An Editor’s Take on Getting This Right the First Time
- Shop the Essentials for Your Aerobar Setup
- Sources
Aerobar Fit Guide: Bench Checklist and Installation Steps
Getting this right starts before you touch a wrench. A clean workstand, a torque wrench, a full set of Allen keys, and a clear head are worth more than any amount of fumbling with the bike propped against a wall.
Clear the handlebar of accessories, computer mounts, and old bar tape near the clamp zone. You need bare metal or carbon to see what you’re actually working with, and grime under a clamp is one of the sneakier ways riders end up with a bar that slips mid-ride.
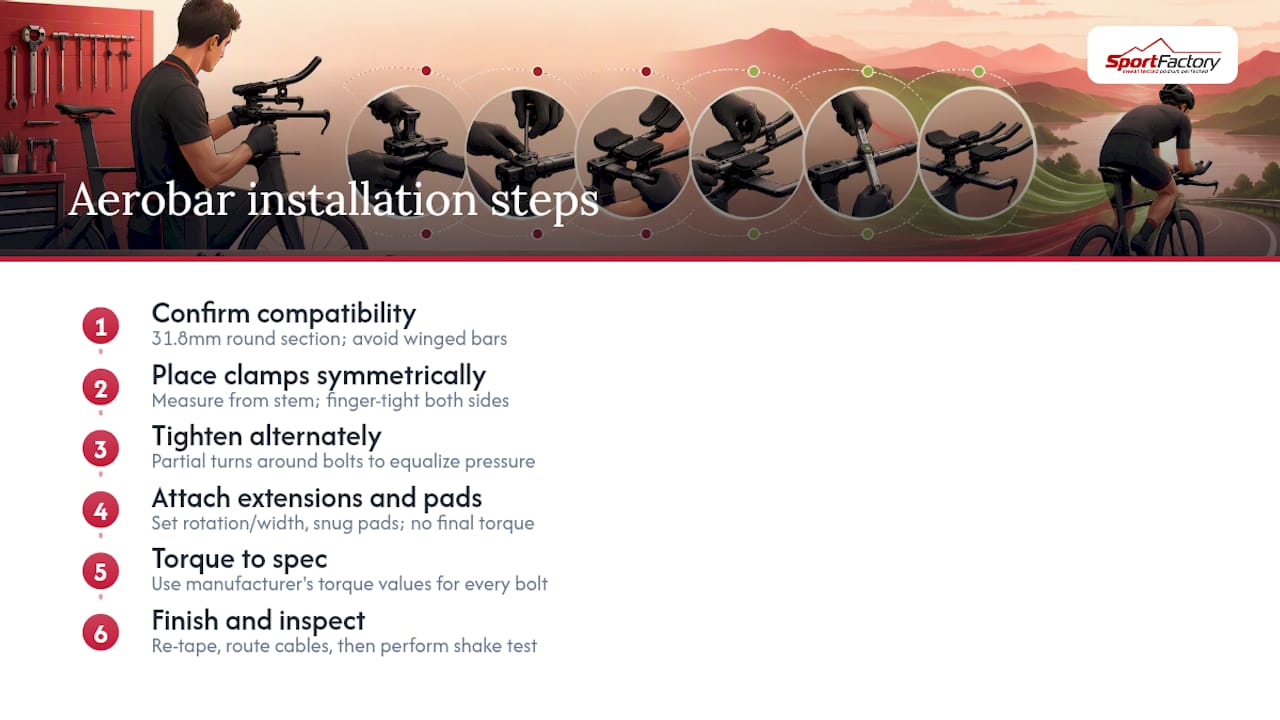
Step 1: Confirm handlebar compatibility. Look for a straight, round section of handlebar near the center, ideally measuring 31.8mm in diameter, since that’s the standard most clip-on aerobar clamps are built around. Many modern integrated cockpits use flat-top or winged shapes that never seat properly with a clip-on clamp, and forcing one onto a shape it wasn’t designed for is how carbon bars crack. If your bar tapers or flares near the stem, check compatibility with the handlebar maker before you spend money on a set of extensions that will never clamp securely.
Step 2: Place the clamps symmetrically. Measure the distance from the stem faceplate to where each clamp will sit, and match that distance on both sides. Asymmetric placement is one of the most common mistakes home mechanics make, and it throws off both the look and the balance of the setup. Set each clamp finger-tight first, then check that both sit at the same distance and same rotational angle before committing to final torque.
Step 3: Tighten in an alternating pattern. Rather than cranking one bolt down fully and moving to the next, tighten each bolt a partial turn, then move to its neighbor, repeating the sequence until you reach spec. This prevents uneven clamping pressure that can crack carbon or leave one side loose while the other is overtightened.
Step 4: Attach extensions and pads. Slide the extensions into the clamps and set them to a preliminary width and rotation, close to level, then snug the pads onto their mounts. Don’t torque anything to final spec yet. This is the point where you eyeball the whole setup from the front and from directly above to check that both sides mirror each other.
Step 5: Torque everything to the manufacturer’s numbers. Every bolt on the system, clamp bolts, extension bolts, pad mounts, has a torque value printed in the aerobar’s manual or stamped near the bolt head. Following those exact numbers rather than tightening “until it feels right” is the single biggest factor in avoiding both slippage and cracked components. A general installation sequence that many mechanics follow lines up closely with this: clean, confirm compatibility, clamp one side finger-tight, mirror on the other side, align, then torque last.
Step 6: Finish and inspect. Re-tape any exposed handlebar sections, route brake and shift cables so they don’t pull tight in the aero position, and give the whole cockpit a firm shake test before the bike leaves the stand.
Pro Tip: Write your torque numbers on a strip of tape and stick it to your seat tube or top tube. You’ll thank yourself the next time you travel with the bike and have to reassemble it in a hotel parking lot without the manual.
How Do You Set Stack, Reach, and Tilt on Aerobars?
Stack, reach, and tilt are the three adjustments that turn a generic aerobar install into a position that actually fits your body. Get the measurement method right first, because guessing at these numbers by eye is how riders end up with wrist pain fifteen miles into a race.
Measuring pad drop. Use a spirit level laid across the saddle to mark the saddle’s midpoint height on a wall or a plumb line, then measure straight down to the top of your elbow pads. That vertical distance, saddle midpoint to pad top, is your pad drop, and it’s the single most useful number in your entire aerobar setup because it’s repeatable across different bikes and different fitters.
Target ranges vary by rider and goal:
- Conservative (pad level with saddle, roughly 0 cm drop): best for new aerobar riders, riders with limited hip or hamstring flexibility, and long-course events where comfort over hours outweighs a few watts of drag reduction.
- Typical age-group range (8 to 10 cm drop): the range most age-group triathletes settle into once they’ve adapted to the position over a few weeks.
- Aggressive range (10 to 20 cm drop): reserved for flexible, power-oriented athletes racing flatter courses where sustained aero benefit outweighs the extra strain on the lower back and hips.
Reach works the same way, but along the horizontal axis instead of the vertical one. A longer reach stretches your torso further forward, which can restrict breathing and cut into sustainable power output if you overdo it. Start with extensions set shorter than you think you need, ride that setup for a week or two, then extend gradually rather than jumping straight to a race-day reach on day one.
Tilt is the adjustment riders skip most often, and it’s usually the reason for numb hands or sore wrists. A slight nose-up tilt on the extensions, just a few degrees, keeps your wrists in a more neutral position instead of forcing them into extension for an entire ride. Check that your hands line up close to the same height as your elbows when resting on the pads. If your wrists bend sharply upward or downward to reach the grips, the tilt needs adjusting before you touch anything else.
One flexibility note worth flagging: top-level athletes optimizing for events sometimes push toward the deeper end of that 10 to 20 cm window, but only after building the hip flexibility and core strength to hold that position without losing power. Chasing the number before your body is ready usually backfires.
Choosing Arm Pad Spacing and Extension Rotation
Pad spacing determines whether your aerobar position feels stable or twitchy, and getting it wrong shows up immediately the first time you hit a bump or need to steer around a pothole.
Start by sitting on the bike, hands relaxed in the position you imagine riding in, and measure the natural distance between your forearms. That number, not a generic default, is your starting point for pad center-to-center spacing.
- Vendor data on aerobar buyers shows an average spacing near 11 centimeters center to center, which works as a reasonable baseline if you have no other reference point.
- Wider shoulders generally call for slightly wider spacing, since forcing narrow pads on a broad-shouldered rider strains the shoulders and reduces breathing room.
- Narrower spacing improves the aero benefit but comes at a real cost to stability, especially in crosswinds or on rough pavement.
- If you’re unsure, split the difference and adjust after a few rides rather than committing to an extreme setting on day one.
Extension rotation matters almost as much as spacing. Set the extensions so your hands rest slightly higher than your elbows, which keeps the wrists in a more natural line and reduces pressure on the ulnar nerve, the nerve responsible for that tingling sensation in your ring and pinky fingers after long stints in the aero position. S-bend and ski-bend extension shapes change how this feels; an S-bend typically brings the hands in and up more aggressively than a straight or ski-bend shape, so the “right” rotation angle depends partly on which extension profile you’re running.
Once both pads are set, check them from directly in front of the bike and from above to confirm they’re symmetrical. Then ride. Small asymmetries that look fine on a stand often reveal themselves the moment you’re pedaling under real load, and a five-minute ride test beats an hour of eyeballing in the garage.
Torque, Carbon Clamps, and Safety Checks You Can’t Skip
The most common cause of aerobar failure isn’t a bad component. It’s a rider who tightened bolts by feel instead of by number.
- Use a calibrated torque wrench every time. Clamp torque and clamping area limitations are the most common cause of component damage when riders add clip-on aerobars, and the fix is straightforward: follow the exact torque values printed by both the aerobar manufacturer and the handlebar manufacturer, not a number you remember from a different bike.
- Never clamp on a non-rated carbon section. Carbon handlebars and extensions often have specific zones engineered to handle clamping force, and shaped or tapered sections outside those zones can crack under stress that a round, rated section would handle without issue. When the handlebar’s shape or markings leave you uncertain, contact the manufacturer directly rather than assuming it’s fine.
- Use carbon assembly paste where the manufacturer recommends it. This friction paste lets you reach proper holding power at lower torque, which reduces the risk of overtightening thin carbon walls. Skip it on bolts and surfaces where the maker doesn’t call for it, and always start bolts by hand to avoid cross-threading.
- Recheck after the first 50 to 100 miles. New installations settle. Bolts that were torqued correctly on day one can loosen slightly as components seat in, so a follow-up check with the same torque wrench is part of the job, not an optional extra.
Pro Tip: Keep a small torque wrench in your travel bike case. Race travel is brutal on bolted components, and a five-minute recheck at the hotel beats discovering a loose clamp at mile two of the bike leg.
Undertorque risks a clamp that slips mid-ride, sometimes catastrophically at speed. Overtorque risks a cracked bar or stripped threads that fail with no warning at all. Neither is a risk worth taking to save five minutes with a wrench.
What Do Studies Say About Comfort vs. Aero Position?
Lower isn’t automatically better, and the research backs that up with real numbers instead of gut feeling.
One controlled study on time-trial posture found that lowering aerobar height reduced drag area by roughly 10.7%, a meaningful aerodynamic gain. It comes at the cost of both raw power output and physical comfort, and the exact trade-off varies by rider, bike geometry, and how long you plan to hold the position.
Separate research on aero handlebar positioning found that even small changes, as little as 5 centimeters, produced measurable reductions in frontal area and drag, while physiological gas exchange responses shifted only modestly. That’s a useful signal for anyone tempted to make one dramatic change to their setup: incremental adjustments of just a few centimeters can move the needle on aerodynamics without demanding a wholesale change to your riding position.
Race conditions should drive your decision more than a spec sheet number:
- Flat, fast courses with a short duration reward a lower, more aggressive position since the aero payoff compounds over speed and time without the same fatigue penalty a longer race would impose.
- Climbing-heavy courses favor a slightly more upright position, since power output and breathing matter more than marginal drag reduction at lower speeds.
- Long-course and ultradistance events should prioritize comfort and handling control over squeezing out the last percentage point of aero gain, since saddle pressure and vibration compound painfully over six, ten, or more hours.
Track your own response to changes rather than copying someone else’s numbers wholesale. Watching your power output, your perceived effort at a given speed, and how your body handles saddle pressure and vibration over a long ride tells you far more than any published average. Comfort during longer exposure to a fixed riding position is worth researching further if you’re logging serious hours in the aero bars, and resources focused on all-day riding comfort offer useful context for anyone building toward multi-hour events.
How Do You Test and Validate a New Aerobar Setup?
A new position needs miles before it earns your trust, and rushing straight to race pace on unfamiliar aerobars is how good positions turn into crash reports.
- Start on a trainer for two to three short sessions. Focus purely on breathing comfort and hand or wrist position rather than effort. Beginning indoors before moving to the road lets you adjust without worrying about traffic, cornering, or braking distance.
- Move to short rides on low-traffic roads. Build confidence steering and braking from the extensions before you add distance or busier terrain to the mix.
- Increase ride duration and terrain variety gradually. Add rolling hills, moderate wind, and slightly longer stints once the short rides feel controlled and comfortable.
- Run handling drills specifically. Practice moving from the extensions to the base bar for cornering, braking hard from the aero position, and checking your sightlines for traffic before committing to race-day use.
- Recheck every fastener after your first few rides. New setups settle, and a five-minute check catches problems before they become roadside repairs.
If you’re chasing race-day performance rather than just comfortable long rides, a professional bike or tri fit is worth the investment. Bring your current saddle-to-pad drop measurement, recent power data, and notes on any numbness, pain, or handling concerns. That baseline data turns a fitting session from guesswork into a targeted adjustment process.
Where to Find Aerobar Parts and Fitting Tools
An e-commerce cycling store curates aerobar systems, clamps, elbow-pad spacers, and torque tools specifically for the kind of hands-on fitting process this guide walks through. Every step above, from confirming clamp compatibility to torquing bolts to spec, depends on having the right hardware in front of you, not a generic multitool that doesn’t match your bike’s requirements.
Riders working through pad spacing adjustments often need elbow-pad spacers to fine-tune width without buying entirely new pads, and that’s a product category that can be kept in stock for exactly this kind of incremental fitting. Torque wrenches calibrated for bicycle components, rather than a shop-grade tool built for automotive work, make the difference between hitting the exact number the handlebar manufacturer specifies and rounding to “close enough.”
Case studies and detailed product breakdowns for specific aerobar systems are continually added to some cycling gear catalogs as new products become available. Checking product pages before a purchase can give clamp diameter specs, torque values, and compatibility notes upfront, which saves the frustration of ordering a set of extensions that won’t seat on a particular handlebar shape.
An Editor’s Take on Getting This Right the First Time
Most riders overcomplicate aerobar fitting by chasing a number they saw on a pro’s bike instead of building their own position from the ground up. That’s backwards. The pad drop on a national champion’s time trial bike means nothing if your hips can’t hold that angle for two hours without your power falling off a cliff.
Three quick wins matter more than anything else in this guide. First, confirm your clamp zone before you buy anything, since a 31.8mm round section is non-negotiable and no amount of clever mounting hardware fixes an incompatible bar. Second, set your pads higher than you think you need at first. You can always lower them once your body adapts, but starting too aggressive usually means backing off after a miserable first few rides. Third, torque to spec every single time, no exceptions, no “close enough by feel.”
Here’s a six-step checklist worth printing and keeping in your toolbox: confirm clamp compatibility, measure and mirror clamp placement, set conservative pad height and reach, torque every bolt to the manufacturer’s number, test on a trainer before the road, and recheck fasteners after your first outdoor rides.
Iterate from there. Your first setup won’t be your last, and that’s fine. If race performance is the goal, a professional fit closes the gap between a comfortable position and a genuinely fast one.
— Matt
Shop the Essentials for Your Aerobar Setup
Some retailers provide a direct path to hardware suitable for this guide’s steps, reducing the guesswork of matching generic parts to a specific bike. Every product category maps to a step above: clip-on aerobar systems for the installation itself, clamps sized to 31.8mm compatibility, elbow-pad spacers for dialing in your armpad spacing, and calibrated torque wrenches for hitting manufacturer specs instead of tightening by feel.

If you’re staring at a handlebar wondering whether your current setup can even accept a clip-on system, start by browsing the aerobar and clamp selection to compare clamp diameters against your bike before you commit to a purchase. Riders fine-tuning an existing position often come back specifically for elbow-pad spacers and torque tools, since those two items solve the two most common fitting frustrations: uneven pad spacing and undertightened bolts. Head to the Sportfactoryproshop shop to check current stock on aerobar systems and fitting tools before your next ride.